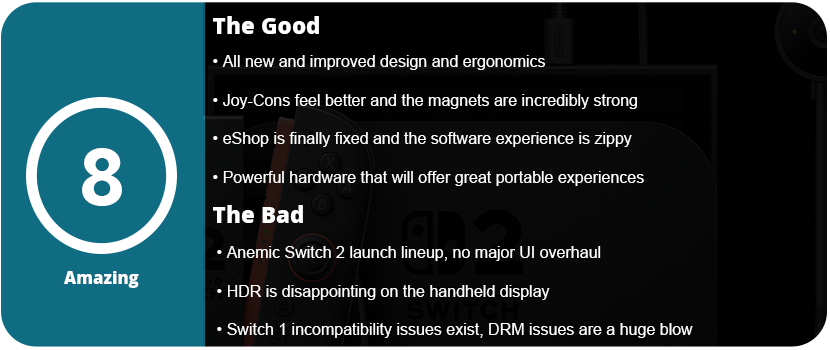
There was a lot of controversy surrounding the PS5 Pro, and rightfully so. Sony didn’t read the room, as people are struggling in a post-COVID economy and gaming has gotten more expensive over the last five years. Prices of hardware are going up over time and not down, which is a trend never before seen. The PS4 Pro was well received, as it improved games significantly, and many developers quickly adapted to the newer hardware, but it wasn’t a significant cost difference over the original hardware. In fact, it was the same price as the base model, and that dropped $100 to $300. This was part of the usual trend. This generation has gone the opposite direction. The base PS5 launched at $500 with the slim version being the same price as the base model, with no price drop for the base model. On top of that, the slim with the disc drive is an $80 add-on, increasing the cost of a slim by $30. You could still buy a slim disc version at $500, but this was all a weird choice. What would be the rationale for purchasing a digital slim for $450 and then adding a disc drive later?
With that out of the way, Sony dropped the PS5 Pro as a digital-only console for $700 and the disc drive add-on increased that by $80. For $780, plus a game, plus PS Plus, a new user could be looking at nearly a grand for a new PS5 experience. This is completely unheard of. Forget the fact that the PS5 Pro comes with a 2TB SSD. It’s a nice bonus, but you can upgrade the drive at any time by adding an SSD up to 4TB. Who needs this much storage? During launch, it wasn’t worth the upgrade. Only a couple of games received Pro patches at launch, and the PS4 Boost mode was nice if you played a lot of those. Outside of this, the Pro offered nothing for already established customers. If you traded in your PS5 it could offset the cost by a few hundred dollars, but that still didn’t make it worthwhile.
Fast forward almost a year later, and the PS5 Pro has seen quite a few updates and many new games supporting its more powerful hardware. Games will don the PS5 Pro Enhanced symbol so you know it will take advantage. Many do this in several ways that we will get to later, but even games not supported can see boosts. Games with unlocked frame rates will run more stable as well as have lowered load times. There’s also the use of PSSR (PlayStation Spectral Super Resolution), which is Sony’s own AI upscaling tech similar to FSR from AMD and DLSS from Nvidia. The hardware is 47% faster in the GPU department with twice the ray-tracing power and the added tech for super sampling. The GPU is an entire generation newer than the base PS5, as it uses RDNA 3 technology instead of the PS5’s RDNA 2.
Getting to Know the Pro
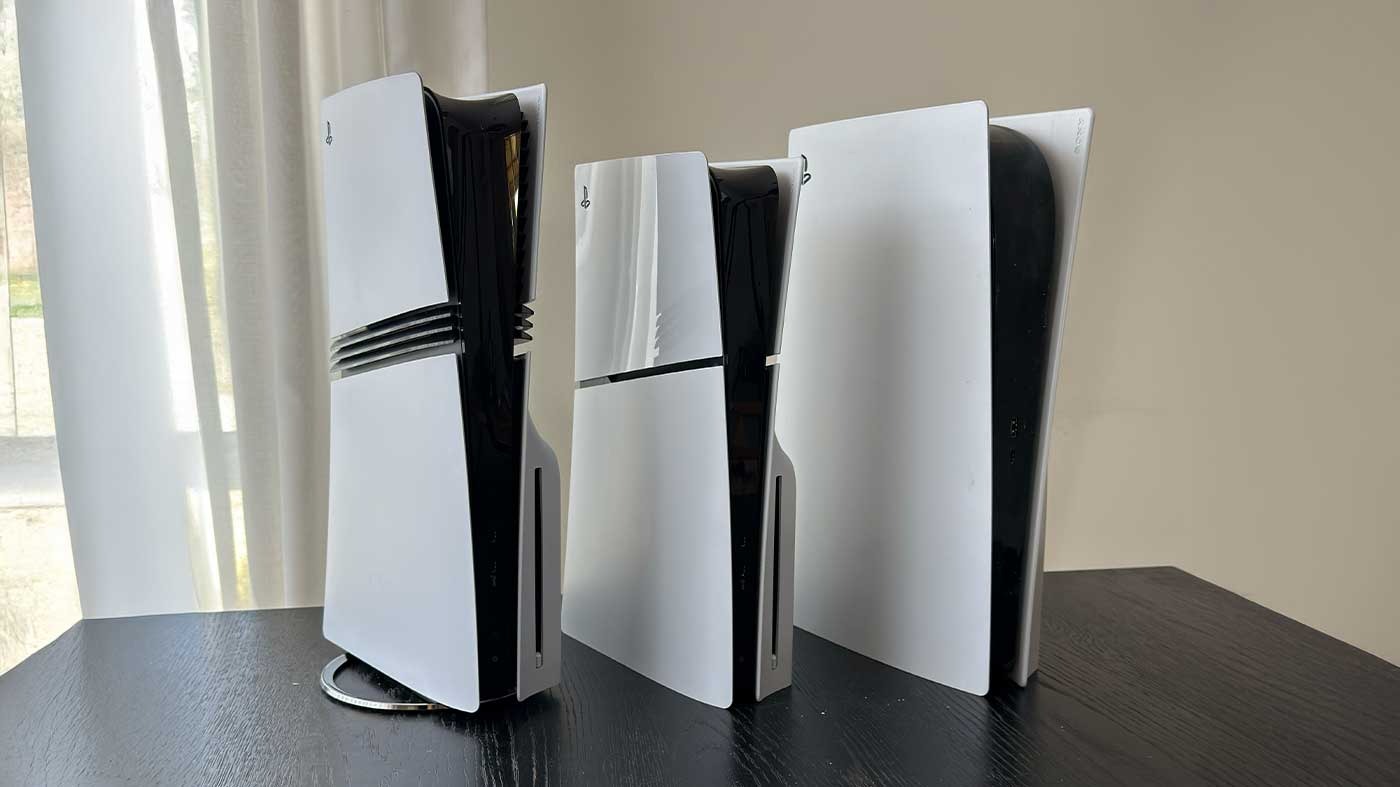
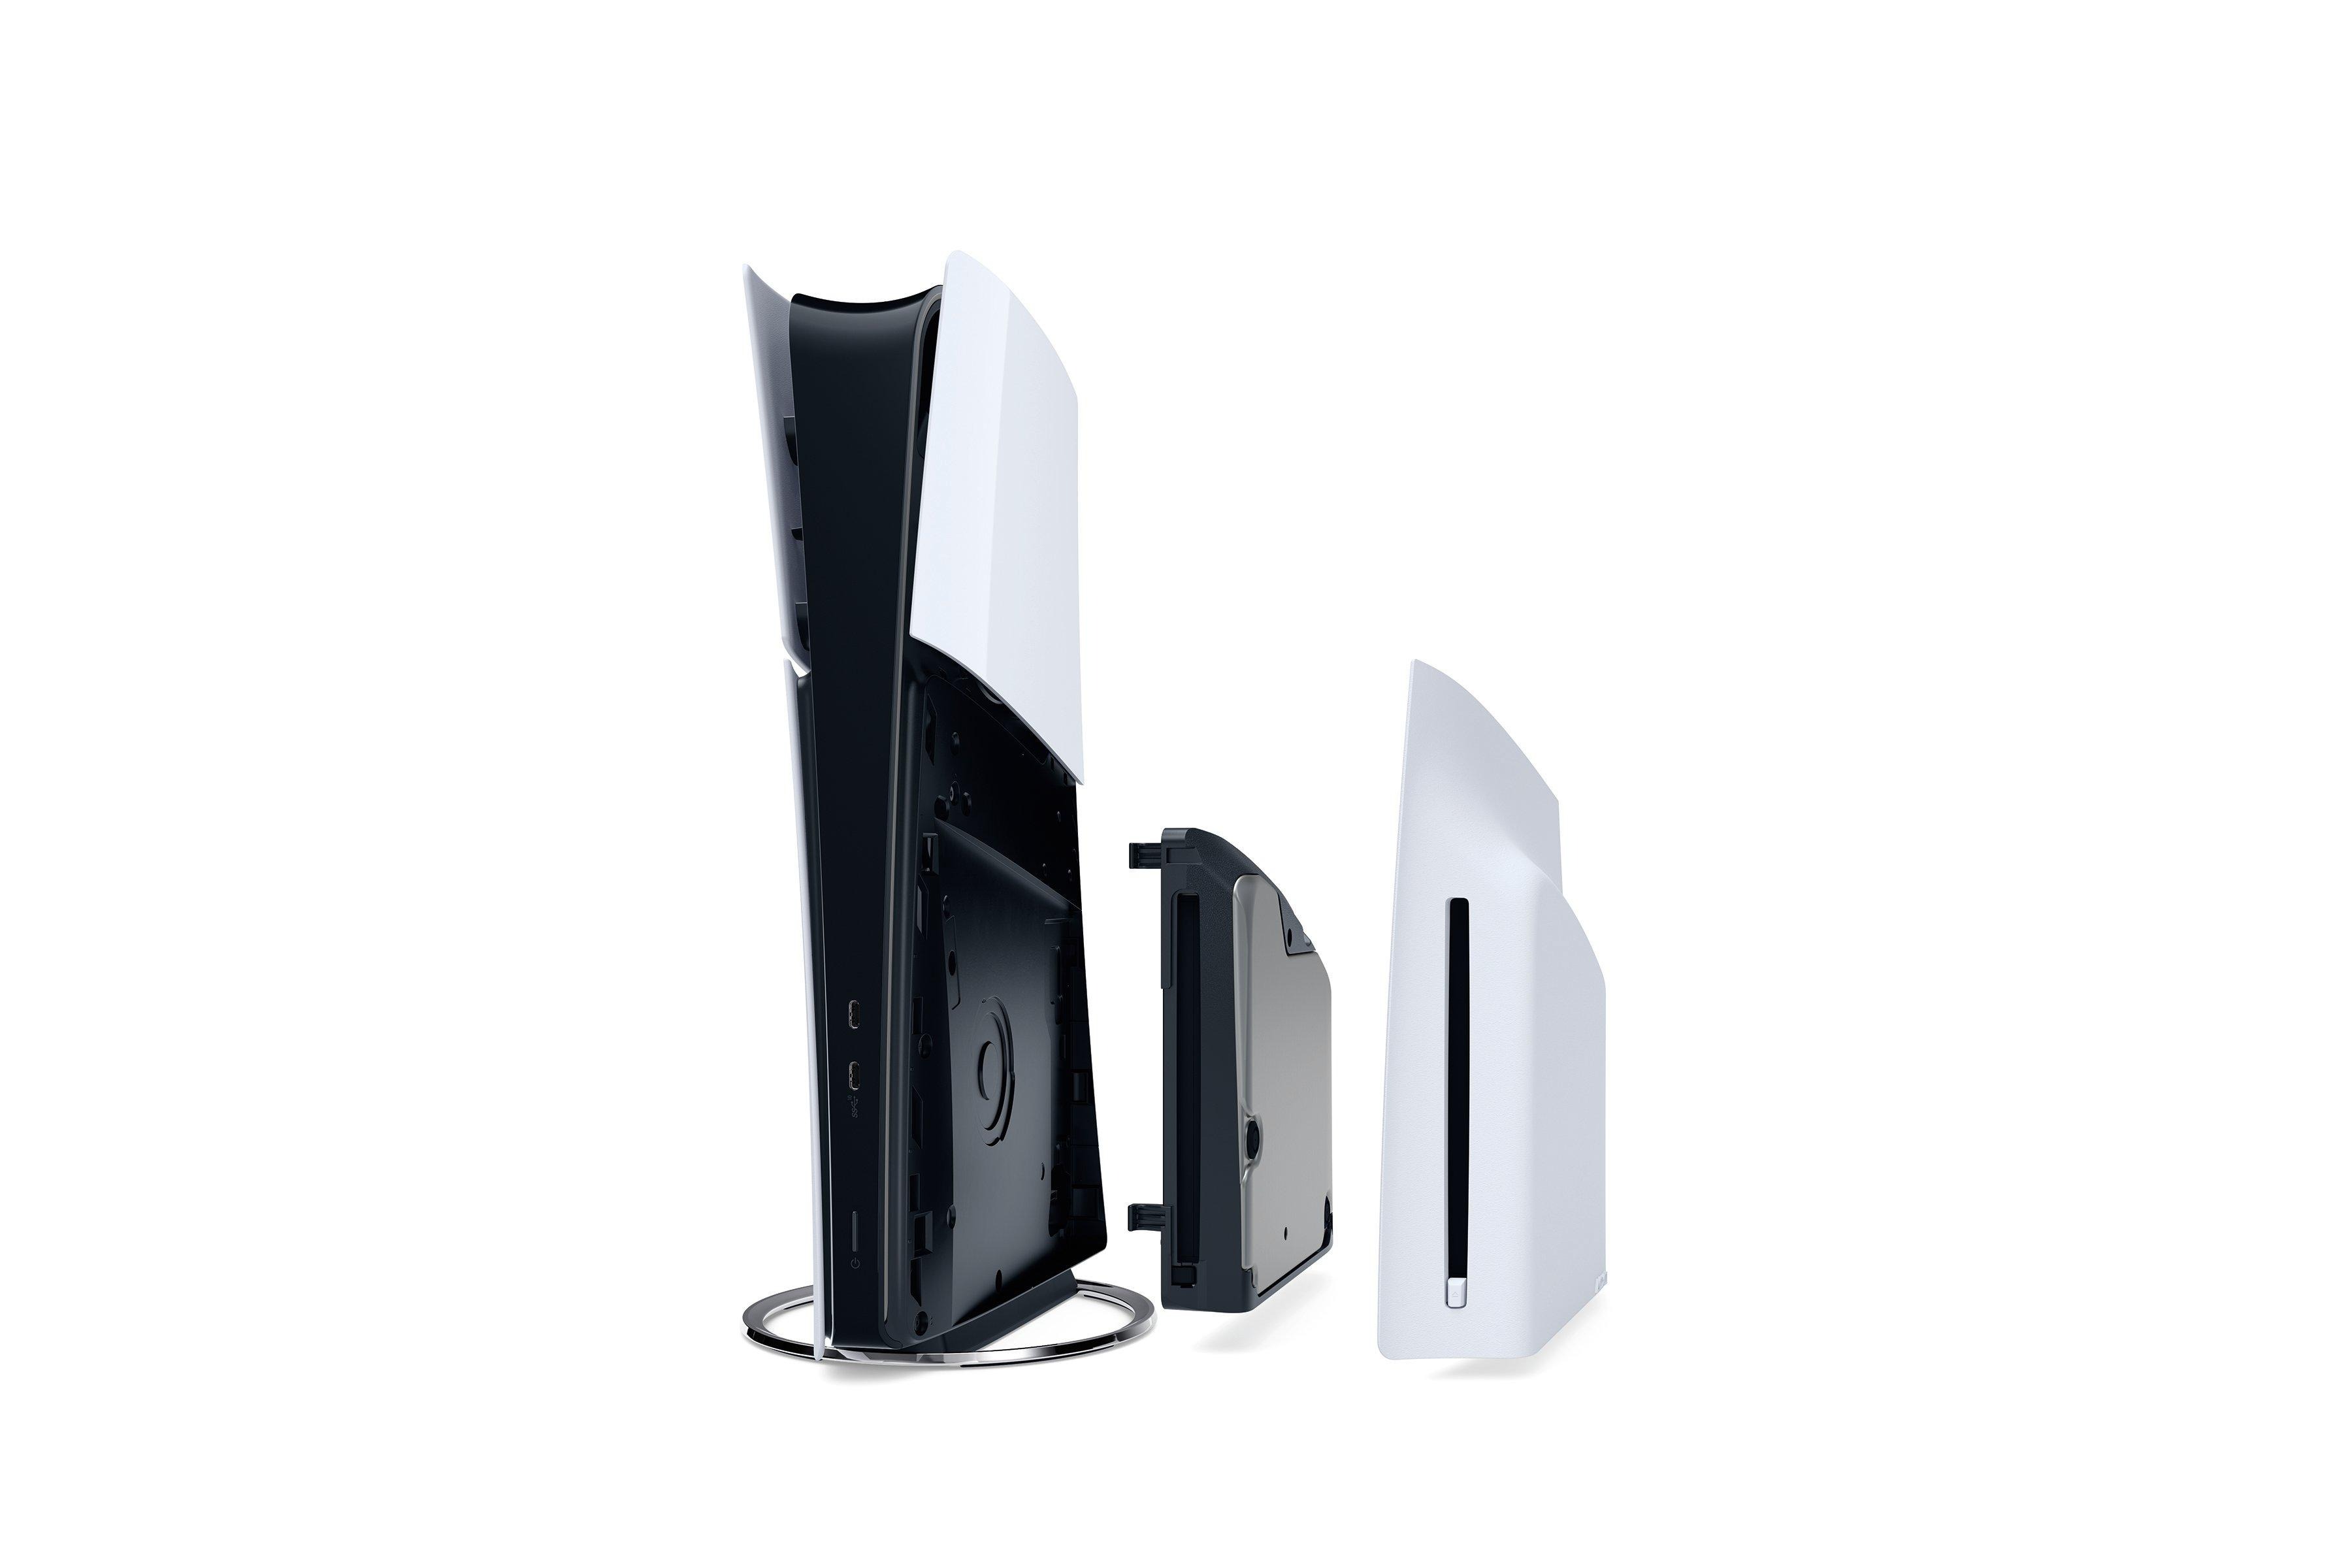
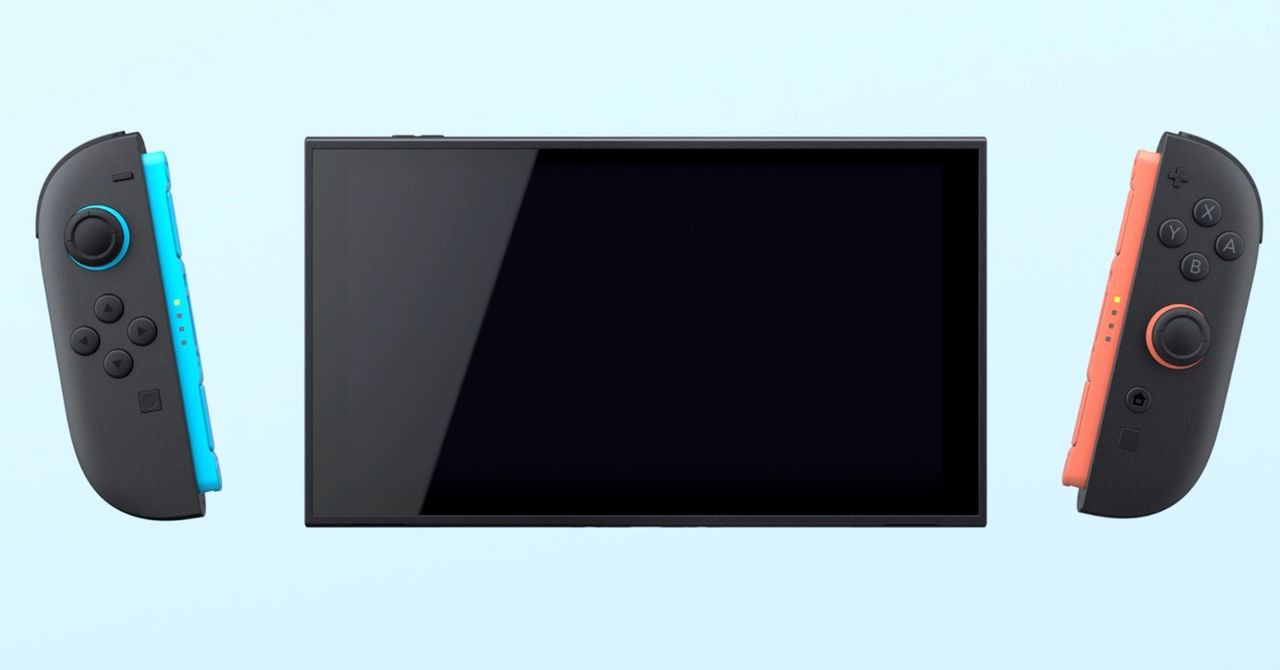
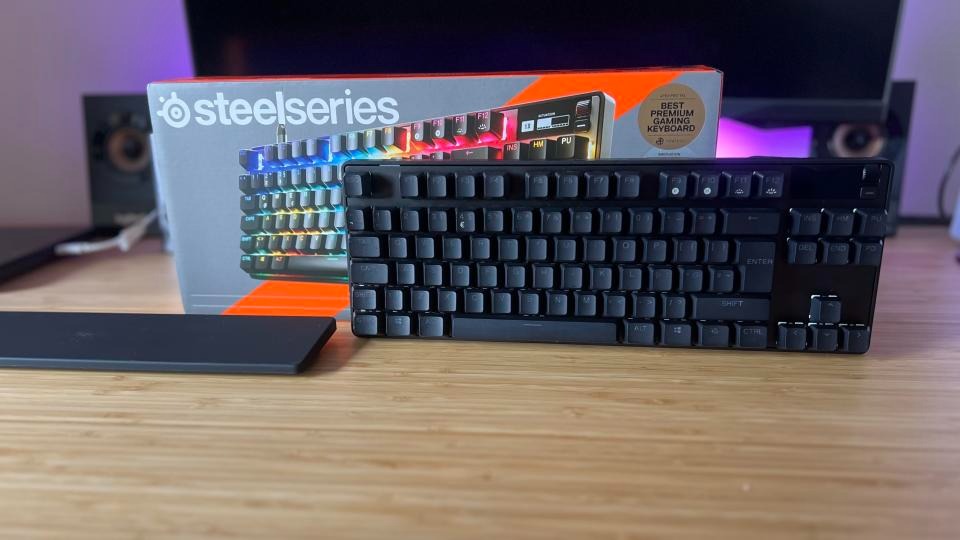
The system looks similar to the Slim PS5. The side panels are now split down the middle and are no longer a singular sheet like on the base model. We get three new “fin lines,” or stripes, which gives the Pro a distinctive look over the other models. There is a vertical stand that is needed with the disc drive. These are two small plastic pegs that raise the console up to meet evenly with the bump. The panels pop off much easier than the base model. Just a swift pull, and they come off, with one side revealing the SSD slot and the other for the disc drive. The system also comes with a new vertical stand, but it is honestly not needed. Due to the lighter weight and slimmer design, the system stands upright really well without a huge risk of falling over. The PS5 Pro is a sleek-looking system, and the subtle changes are a nice touch.
I won’t be getting into the controller or anything like that, as it’s all the same. This isn’t Xbox, where the controller changes three times in one generation. I will say that there are two USB-C ports in the front now, losing a USB-A port with two A ports in the rear. The LED lights on the front extend from top to bottom now rather than just around the top’s hump like on the base model.
As for games, the difference is noticeable, and the cost can justify this. I tested several games out, and while other sites do a better job with visuals, graphics, and what not, from just a gamer’s perspective I can easily say that games that aren’t PS5 Pro run better when they have unlocked frame rates. Using Balanced modes with a 120 Hz TV is night and day over the 30FPS locked Quality that we normally get. That extra 10 frames can really make a difference. Games like Cyberpunk 2077 have an unlocked performance mode so you can easily hit 70-80 FPS, while the RT quality mode is now mostly locked at 40FPS rather than dipping below 30. Games that use PSSR like God of War Ragnarok and Assassin’s Creed Shadows, look a lot better, and this is a great FPS boost as well.
With that said, the PS5 Pro is subjective to the user. Some current users may find the boost in power worthwhile, like I did. You, of course, need a proper TV that can take advantage of the hardware. 120 Hz minimum is a must, or you’re throwing performance out the window. I also highly recommend an OLED TV with at least 1,000 nits and HGiG for good HDR. While HDR doesn’t really have a standard yet, the brighter your OLED can display, the better HDR will look. You must also properly set up your TV with Game Mode and turn off all processing. Look up guides on your TV model for a suitable baseline.
For $700 (and now $750 as of this writing due to US tariffs), the PS5 Pro is a worthy upgrade and a perfect entry point for new PlayStation users. If you really want your games to look the best, this is the way to go. That is if you already have a proper TV. If you don’t, your setup could become astronomically expensive, shooting well above $2,000 for a proper setup for the Pro. I personally have a 65″ Samsung S90D to go along with the Pro, and I am playing console games now more than I ever have. Do yourself a favor; look up some videos on graphics comparisons to see if it’s worth it to you. If anything, a higher frame rate is more than worth the upgrade for most.
We finally made it. It took over 8 years, and what feels like a whole life ago, to get to the sequel. Nintendo’s success has been largely attributed to the success of the Switch. 2017 was a tough year. In the first year, the console was met with little fanfare and releases, but it gradually gained popularity and surpassed the PlayStation 2 and Nintendo DS to become the single best-selling console of all time. Around 2020 people wanted a Switch Pro, but instead we got other typical iterations of the Switch, such as the Lite and OLED. We met both of these models with plenty of enthusiasm, but we saw no raw spec upgrade for the system. Ever. What people wanted was divided. Some individuals desired Nintendo to innovate, much like they did with the Wii nearly two decades ago, while others simply desired an improved version of the Switch. We got the latter.
Some Tech for Your Brain
The Switch 2 wasn’t announced with open arms. Not entirely. A lot of outcry has been about pricing, game ownership, and specs. What we got spec-wise was more than expected from Nintendo. While the Switch 2 does not quite surpass the competition, it is positioned closely alongside them. The Switch 2 boasts a custom Nvidia chipset with Ampere technology. This feature puts the Switch 2 in the same ballpark as the RTX 2050 Mobile series GPUs, but it’s not a 1:1 scale. The weaker CPU, which is identical to the one in the Switch 1, is what primarily holds it back. Despite a more powerful next-gen GPU the CPU being weak means that games will need to be well optimized to push everything to the GPU as much as possible. Nintendo’s power was obviously scaled back for mobility, but the system uses more modern technology while docked, such as HDR, ALLM, VRR, and higher refresh rates, as well as PCM Linear 5.1 surround sound. We now have increased onboard storage of 256 GB, which means purchasing a micro SD card is not immediately necessary. However, Nintendo locked many users out, as you can’t go grab that 128GB SD card that’s been sitting in a drawer. You need express-rated SD cards, which are quite pricey right now. While the SD card technology isn’t a proprietary storage solution like Sony used to use, it does limit a lot of people and requires you to shell out more money for an already expensive console.
Unboxing a Slate
The unboxing experience isn’t anything special, and I’ve mentioned this with other modern devices. The focus is less consumer waste, less cardboard, no polystyrene, and fewer things to throw away. You receive all the same items that were included with the original Switch: Two Joy-Cons, a dock, an HDMI cable, a power cable, and Joy-Con straps. While these are essentially the same, they are also updated and new. For example, the power brick is now a detachable USB-C cable, so you can replace the cable if it fails. The Switch 2, however, needs a more powerful power supply. The Switch 1’s 15 measly watts won’t suffice anymore. The Switch 2 uses 60W, so you will need to upgrade your power banks and charger adapters. Handheld gaming PCs (usually 65W) will suffice. The dock is new and updated. The updated dock now includes a built-in fan, which makes it bulkier; however, it also features a back cover that can be completely removed, exposing the same ports: HDMI, USB-C, and LAN. We also get two USB-A ports on the side. It feels appealing and solid, but it is not backwards compatible with the original Switch.
Hardware Overview: Joy-Cons of Madness or Greatness?
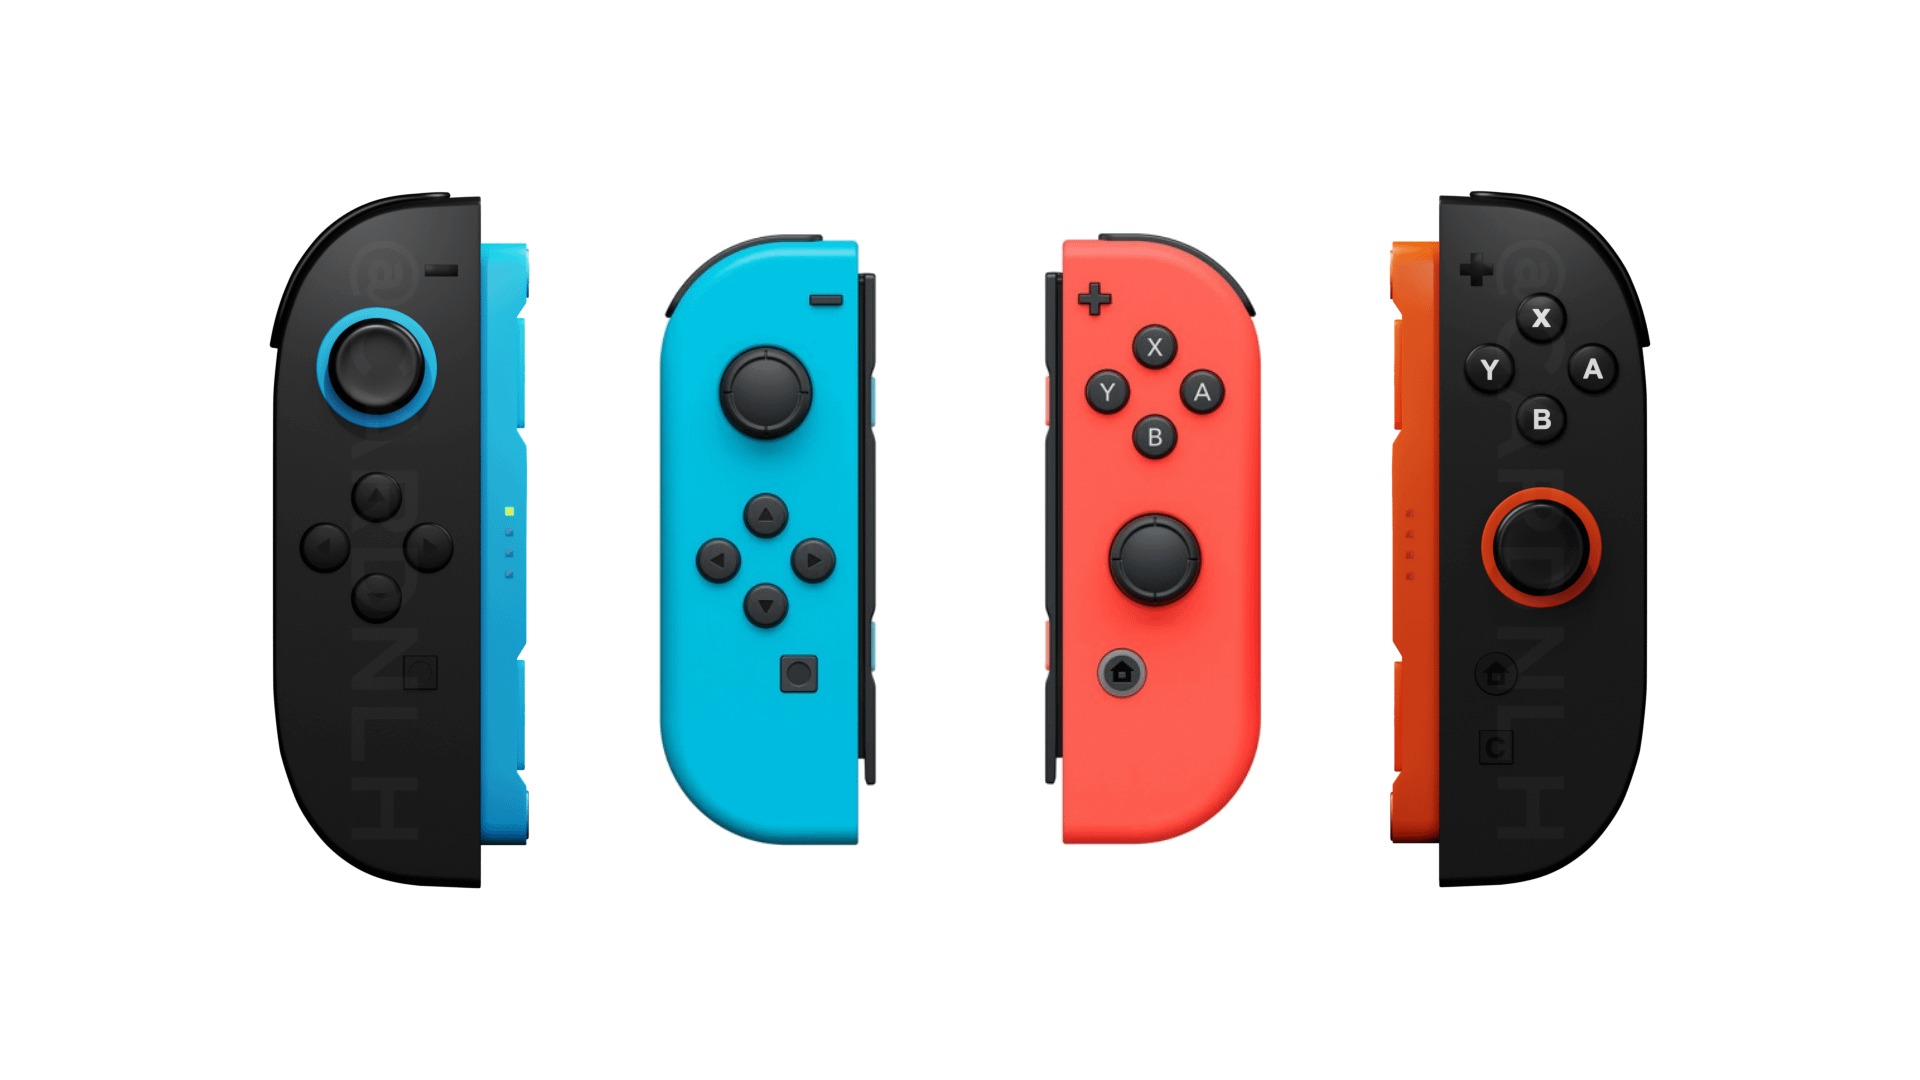
To get the biggest question out of the way, it’s uncertain if the new Joy-Cons will drift, but they lack Hall Effect sensors. They are apparently built from the ground up to avoid this, but only time will tell. With that said, they are slightly larger than the original ones and are much more comfortable to hold. The buttons are less mushy and have a more tactile click. Sadly, there’s still no real D-pad, but the clickiness of the buttons makes it feel a bit better. Here’s the other big question. What’s the deal with those magnets? It’s a real gamble, and somehow Nintendo pulled it off. They are incredibly strong. There is a new “trigger” switch on the back of the JCs that you pull, like ZL or ZR, and this activates a plunger that pushes the JC away from the console. The electrical connection is now a new connector slot that also adds stability. It’s a very satisfying feeling, and the new JC animations that play are nice. It’s such a strong magnet that you get a physical and audible snap when connecting them. There is an ever-so-slight wobble when twisting the system slightly, but it’s not noticeable when actually playing. We will see over time how these hold up mechanically. The JC’s new controller dock is nearly the same, but it’s taller than wide. I still had hand cramps when using this thing, and sadly, I never really used it for the original Switch. This accessory was reserved for people who used the JCs as a controller and, for the most part, was stored in a drawer for the last 8 years. The same fate will occur with this device.
Hardware Overview: Upgrade or New Machine?
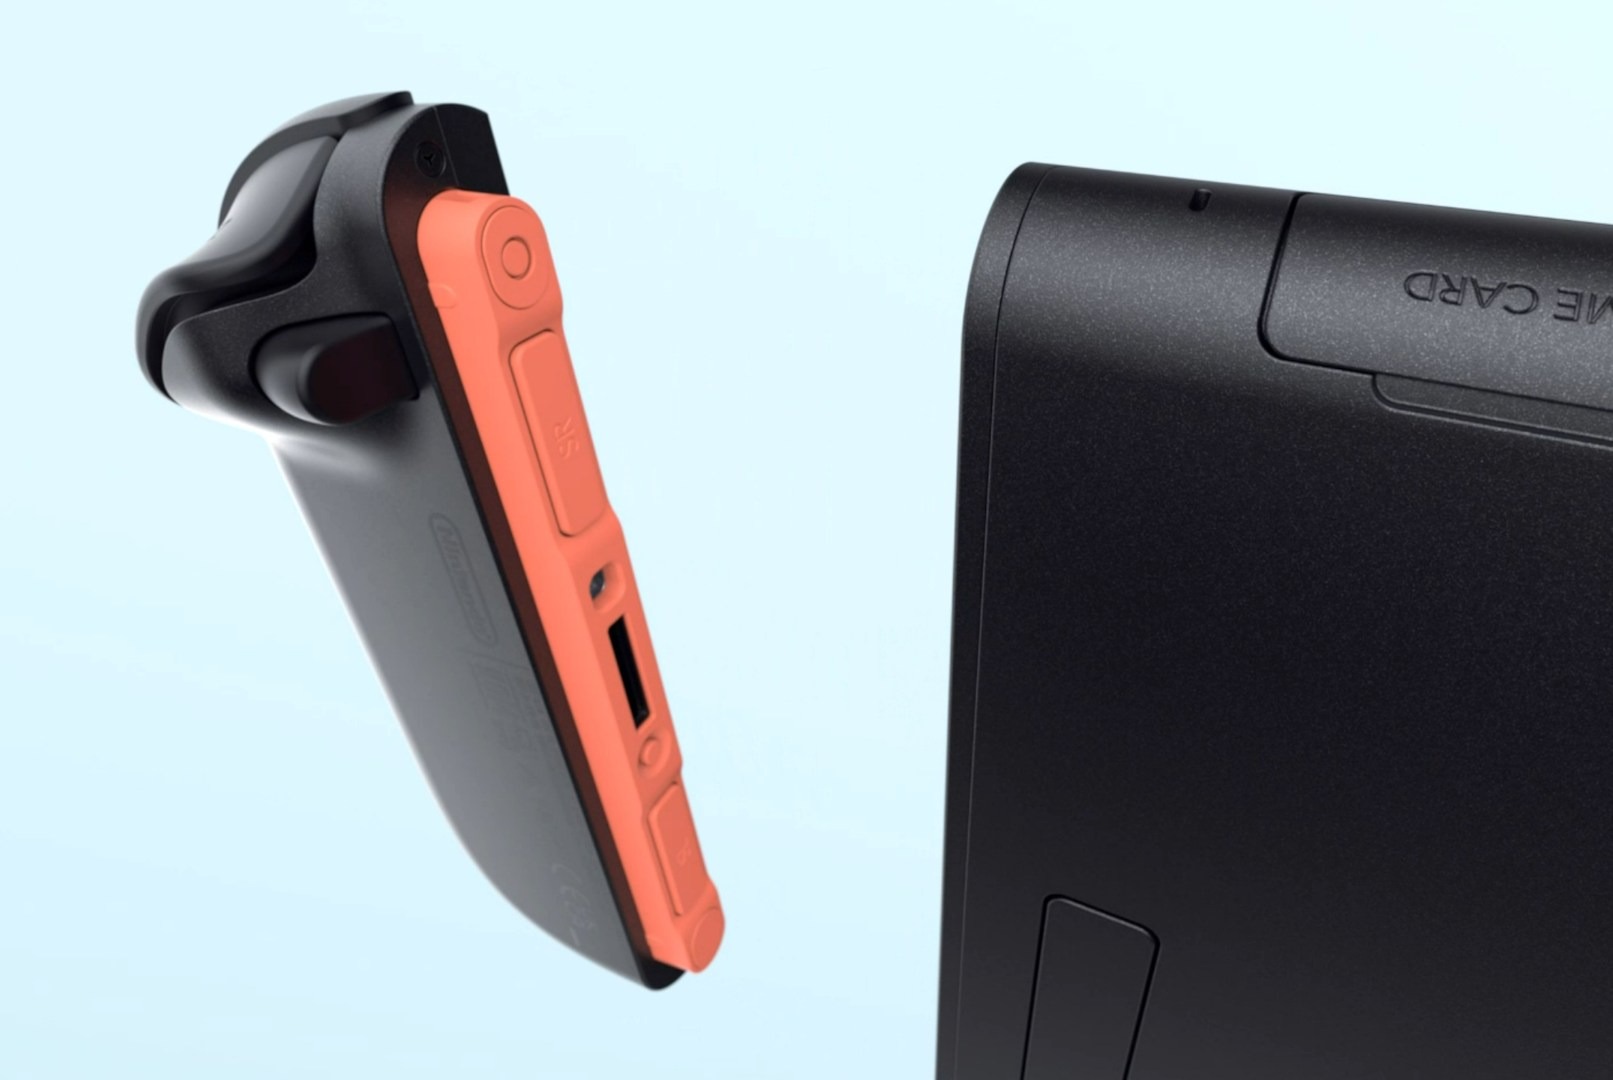
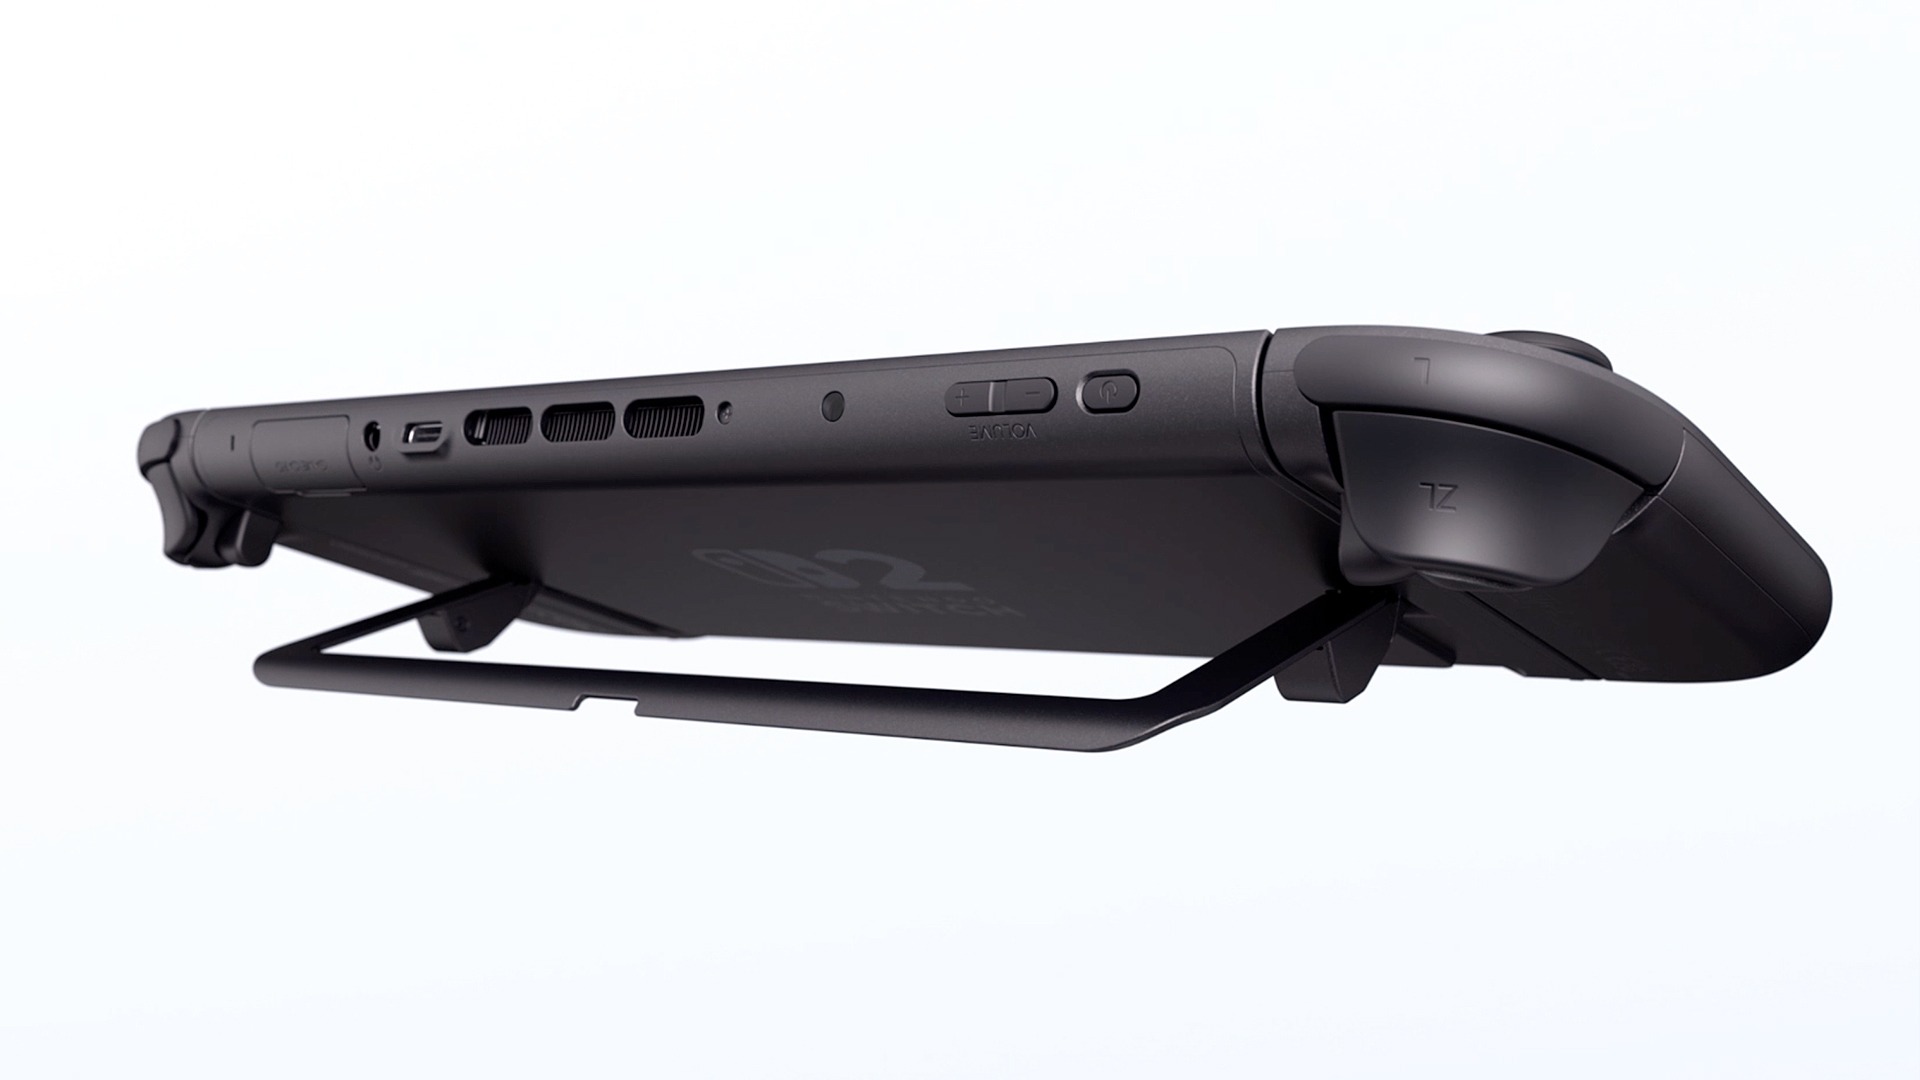
The tablet itself looks nearly identical to the OLED tablet but is larger, with a 7.9″ LCD. It has HDR and 120 Hz, like the Steam Deck, but it’s not OLED. The Steam Deck OLED has a 90 Hz OLED display with HDR, and while its screen is a very nice LCD, it’s still not as crisp and vivid as an OLED display. It feels heavier and very solid. All of the ports and buttons are in the same place as the OLED model, but there are a few tweaks. Intake vents have been added to the bottom of the system, located on either side of the USB port. This allows for more efficient cooling. The system is hushed when the fans are kicked on. The kickstand is now a round plastic piece rather than a solid flap. It extends out more, just like the OLED, so the change is a great improvement. The micro SD card slot is located behind this component, and the system now supports express micro SD cards, which are slightly more expensive than standard cards; however, I believe their prices will decrease significantly by next year. The game card slot has a pull-out flap that now has a metal box that sits over the game card. I’m not sure what this metal reinforcement was for, as I have yet to get ahold of a Switch 2 cart. One of my favorite new features is the USB-C port on top of the unit, which will help relieve strain on the bottom port when playing while charging or lying down. This seems like a feature taken from the handheld PC scene. Overall, the tablet adheres to the adage “if it’s not broken, don’t fix it,” and I appreciate their decision.
Software Overview: The Account Transplant
Nintendo’s online features have never been particularly efficient, and utilizing their account features presents a significant challenge. Don’t even begin to discuss the complexities of the Switch 1’s parental controls and digital game ownership. With that said, transferring accounts is similar to the process used for smartphones. You have to connect both units to a charger (super annoying), and you just begin the transfer on both devices. This initial transfer has to be done when the system is initialized. If you cancel it, you have to reset the system back to factory defaults; there’s no option in the settings to do this. You can also do a server transfer if your Switch is dead or you no longer have it. Another option is to remotely wipe your Switch 1 once it’s connected back to the internet. This process transfers all account information, offline saves, and ownership of digital games and DLC. It does not transfer actual game data. You will need to redownload everything. The third option is specifically designed for new Switch 2 owners without a Nintendo account, requiring them to start from the beginning. If you have NSO (Nintendo Switch Online), you can choose not to do a system transfer since all your saves are stored in the cloud; however, you will still need to set the Switch 2 as your primary device. This was a very painless process, and I had zero issues.
Software Overview: The Use Experience
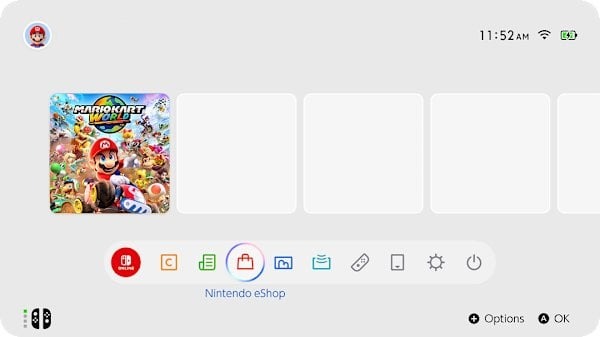
It’s to no one’s surprise that the UI is mostly the same. It’s the same boring row of icons with a black or white theme. Yeah…no themes still. The UI is more “Nintendofied” this time around with adorable sound effects for every system icon, and there’s an RGB-outlined swirl when you hover over something. It’s also snappier and more fluid, but it’s still the most basic UI of any modern Nintendo console. Thankfully the eShop has been completely fixed. It’s a new interface with videos that instantly load when hovering over icons, and it feels fluid. I also noticed the algorithm for recommended games has been immensely improved. No longer will you get shown mostly hentai or alarm clocks. While it’s refreshing to see this improvement, the overall eShop hasn’t changed much, and it didn’t need to. It worked; it was just dog slow and locked up the Switch sometimes. There are new icons at the bottom of the screen now with Virtual Cards and GameShare; these are the only two major software updates the Switch 2 got. There’s also a new button on the Joy-Con, a C button, for Chat. The button pulls up GameChat. Nintendo has finally gotten on board with live video and messaging.
Software Overview: DRM is the Future
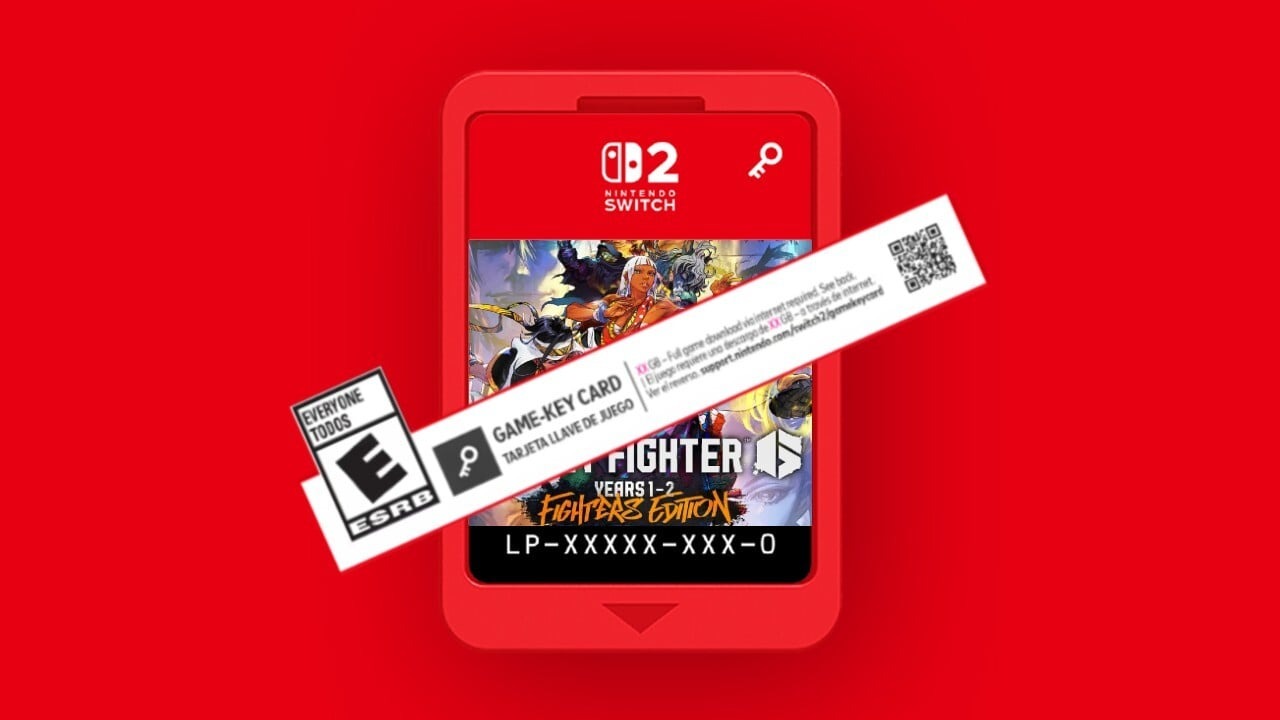
Nintendo has introduced two new features to enhance DRM; however, this solution resolves one issue. The virtual cards are both cool and annoying. This results in the introduction of new Game Key Cards, which can be obtained physically but do not contain any game data. The experience feels like Code-in-a-Box with more steps. It’s cool that you get a tangible item like a physical box, but it means nothing once the service shuts down. The Virtual Card system has fixed the parental control problems that plagued the original Switch. You now can just lend the digital game to a family member that’s in your family group. This is good for 2 weeks, and then you can renew it. This means your Switch doesn’t have to be the primary Switch that your child will use if you end up buying games on your account so they can use them. However, if you want to then play the game, you must revoke the card to load it onto your account again.
Nintendo has also implemented some way to brick your console and disable it remotely if you are caught hacking the services or modifying the Nintendo services in any way. This has been a misleading piece of info stating you don’t own your Switch 2 and it will be bricked if you modify the firmware. This procedure has been possible since consoles could connect to the internet. The Xbox 360, for example, would disable your Xbox account and ban it from the servers if you installed a mod chip and went online or hacked into games too often. Such behavior has been a standard practice since the mid-80s.
Software Overview: The Games: Updated and New
Let’s talk about why you even got this thing. The games. The launch lineup is fragile. Although the launch lineup is among the weakest of any console launch, the games themselves exhibit considerable strength. If you want to fully utilize the Switch 2’s hardware, Mario Kart World, Cyberpunk 2077, and Fast Fusion are the games to consider. Some Switch 1 games received full Switch 2 upgrades, including The Legend of Zelda: Breath of the Wild and Tears of the Kingdom, while a few others received free updates, including Super Mario 3D World, Pokemon Scarlet and Violet, and Super Mario Odyssey. The Switch 1 games aren’t always going to transition to the new system very well. If the Switch games didn’t support scaling in any way, the game could look more blurry and ugly even in handheld mode. Some games are going to need updates and will make a lot of Switch 1 games either unplayable or less enjoyable than the original console. Games that had unlocked frame rates or locked frames, like 30 or 60, will enjoy more stable gameplay. Some Switch 1 games are already getting these benefits without any update, including faster load times.
For 120 FPS there is only one game that supports this, and that’s Welcome Tour via a mini-game. The only confirmed game to have this feature is Metroid Prime 4 as of this writing. This is something that even the PS5 and Xbox Series X don’t have much of. Only 2 Switch games support HDR, VRR, and ALLM. These also have to be programmed into the game, and not many currently support this with the small launch lineup that we got. I found that games do look and play great like you would expect, and HDR works fine even on the handheld screen. While it’s not quite as vivid as an OLED it’s quite a crisp screen and looks good.
Early Adopters Need Patience
Just like with the Switch 1, early adopters need to be patient. While we have an entire backlog of Switch games to still play, there are some that don’t work, need patching, or simply will never work or get patched. Don’t throw away your Switch 1 just yet. There is an anemic Switch 2 game offering right now, and unless you really want any of those games, holding off for a year wouldn’t hurt. However, there’s also nothing wrong with getting one just to play Switch 1 games, as a lot do run better. There are other issues, like a lot of third-party controllers no longer work and need patches. All of my 8bitdo controllers don’t work or have issues, but they have already released firmware updates for many controllers. HDR isn’t perfect and needs some patching as well. The display itself only has 450 nits, which isn’t adequate for proper HDR. The HDR performance is better on the TV, but the current offerings for the Switch 2 do not look promising.
See You In 2033
In the end, the Switch 2 currently offers a lot of value for mostly newcomers—those who skipped the original Switch. There’s also no loss in upgrading sooner rather than later because all of your games will work as long as they don’t require features from the Switch 1 that didn’t carry over. Yes, the launch lineup is weak and small, but the hardware is a massive upgrade over the original, and we should see some great things from Nintendo over the next couple of years. The sequel will be a slow burn just like Switch 1, with only a couple of first-party games announced for release this year. This is sadly due to Nintendo having to play catch-up with their tech that’s been around for five years already. The Joy-Cons are more enjoyable to use, the mouse mode works surprisingly well, and the handheld display is great. We sadly don’t get much of a UI overhaul, but at least the eShop works as intended. It’s the Switch 1, but better, which is what everyone wanted.
It’s time to move on. I have used “gamer” or gaming keyboards since I started PC gaming back in 2009. Once I had adult money, I could buy the keyboards I wanted. I have had quite a few over time, and there was always something off about them. They either feature a gimmick that causes their price to be a “premium” price or they lack something somewhere. My last gaming keyboard was a Logitech G915, which I’m thrilled with; however, I don’t quite like the keys too much despite how clicky they are. My last-ditch effort was trying the latest offerings from Razer and SteelSeries, but I’m at a point in which RGB just isn’t a priority for keyboards anymore. I’m a touch typist; I always have been. I learned to type in the 3rd grade in computer class. I rarely look down at my keyboard unless I’m using a key I seldom use. My first custom keyboard was the 8bitdo NES keyboard, and I added my own switches and did a tape mod. That was my gateway keyboard for custom keyboards. The pre-manufactured gaming keyboards just lack any kind of personality or customization, even the newest keyboards that allow switch swapping.
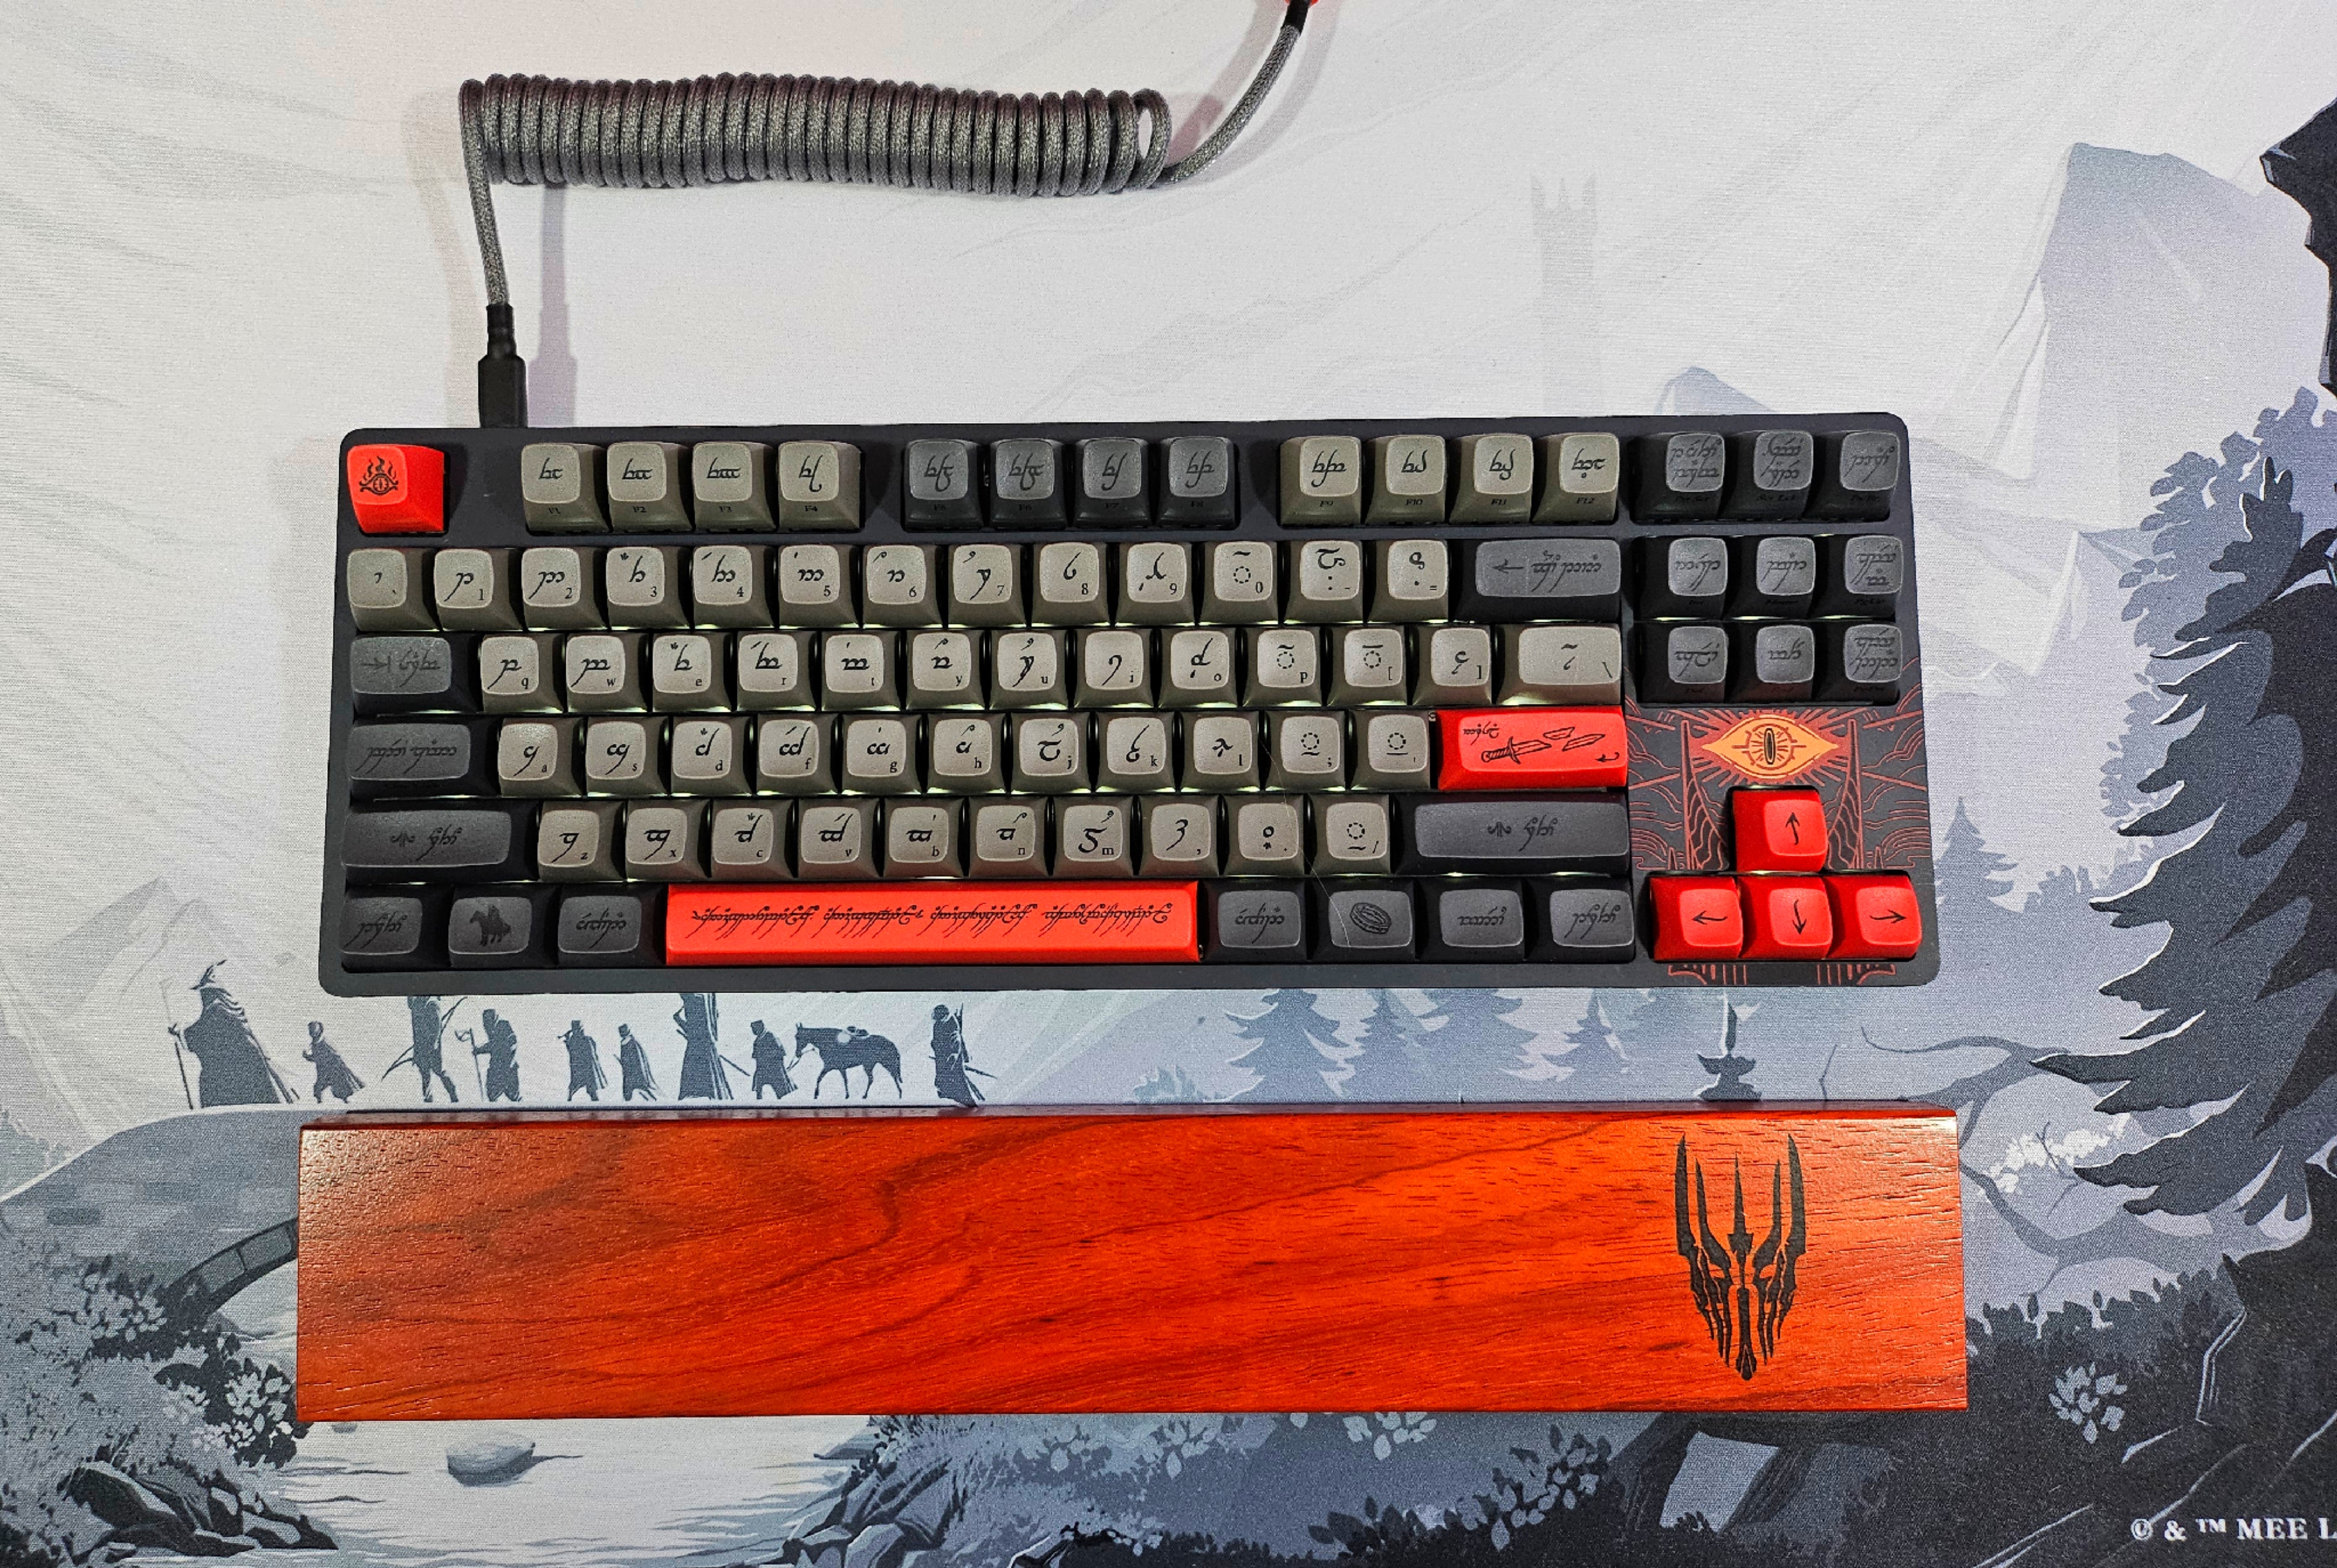
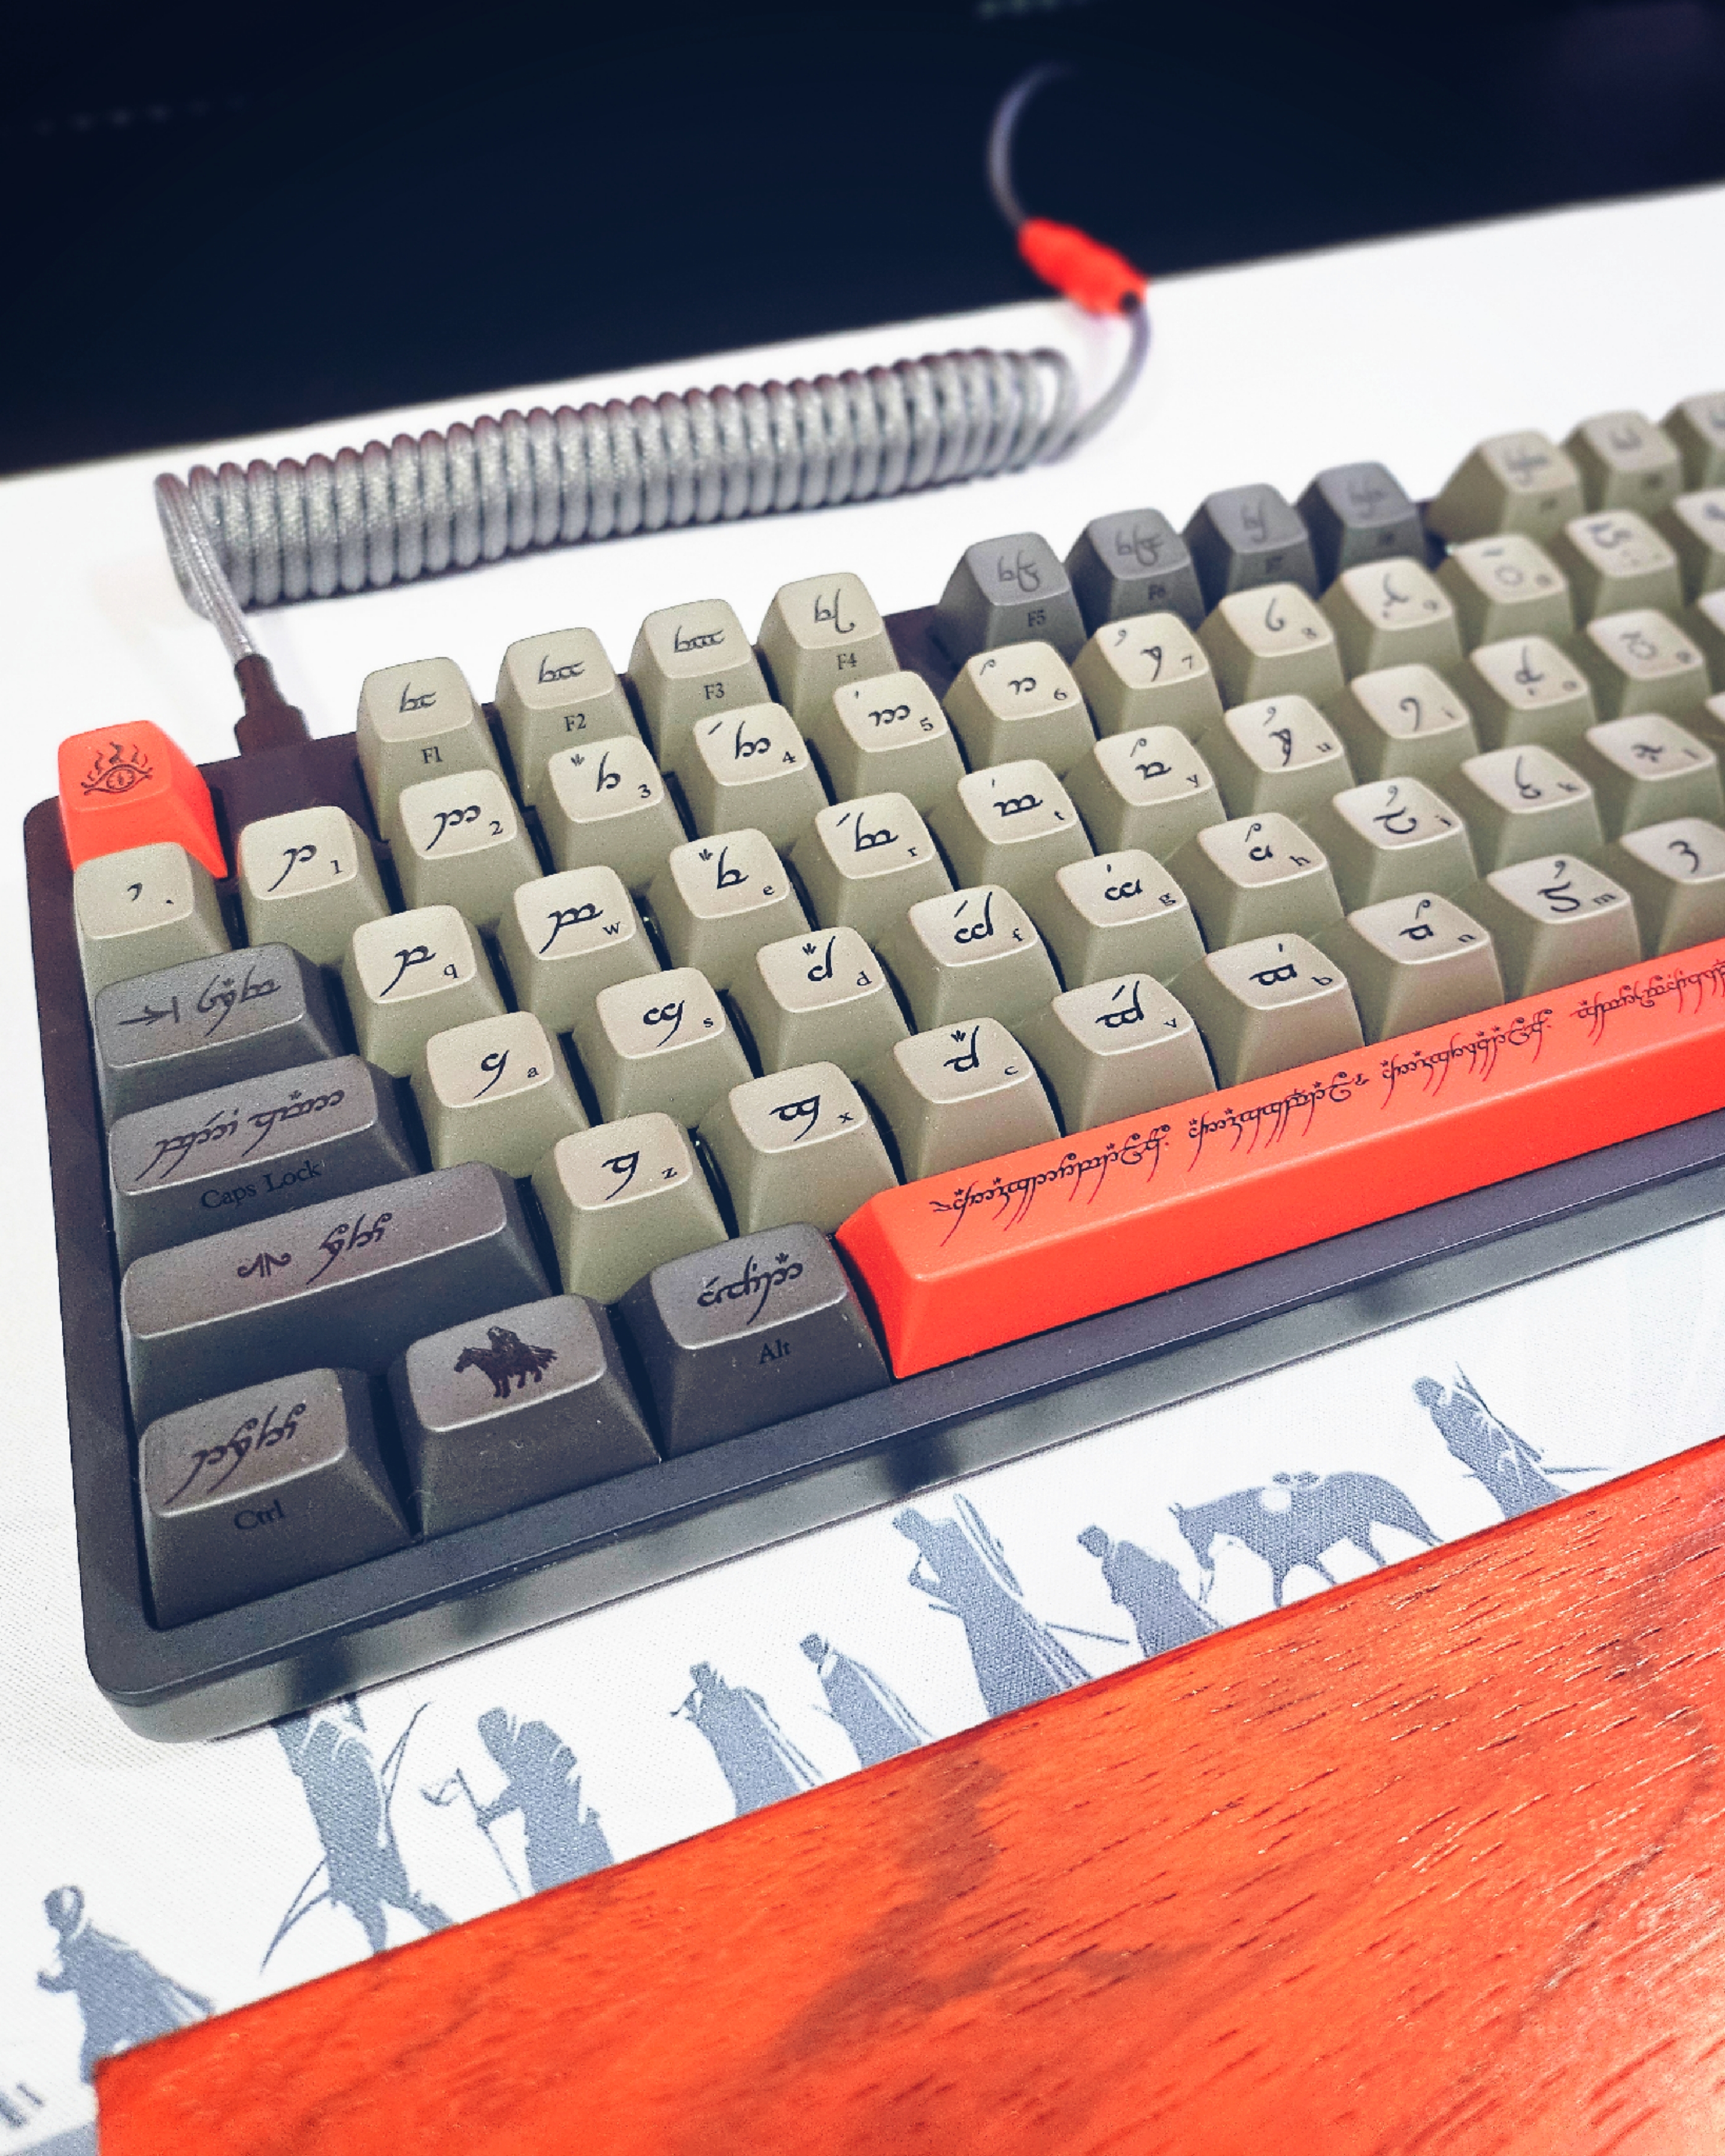
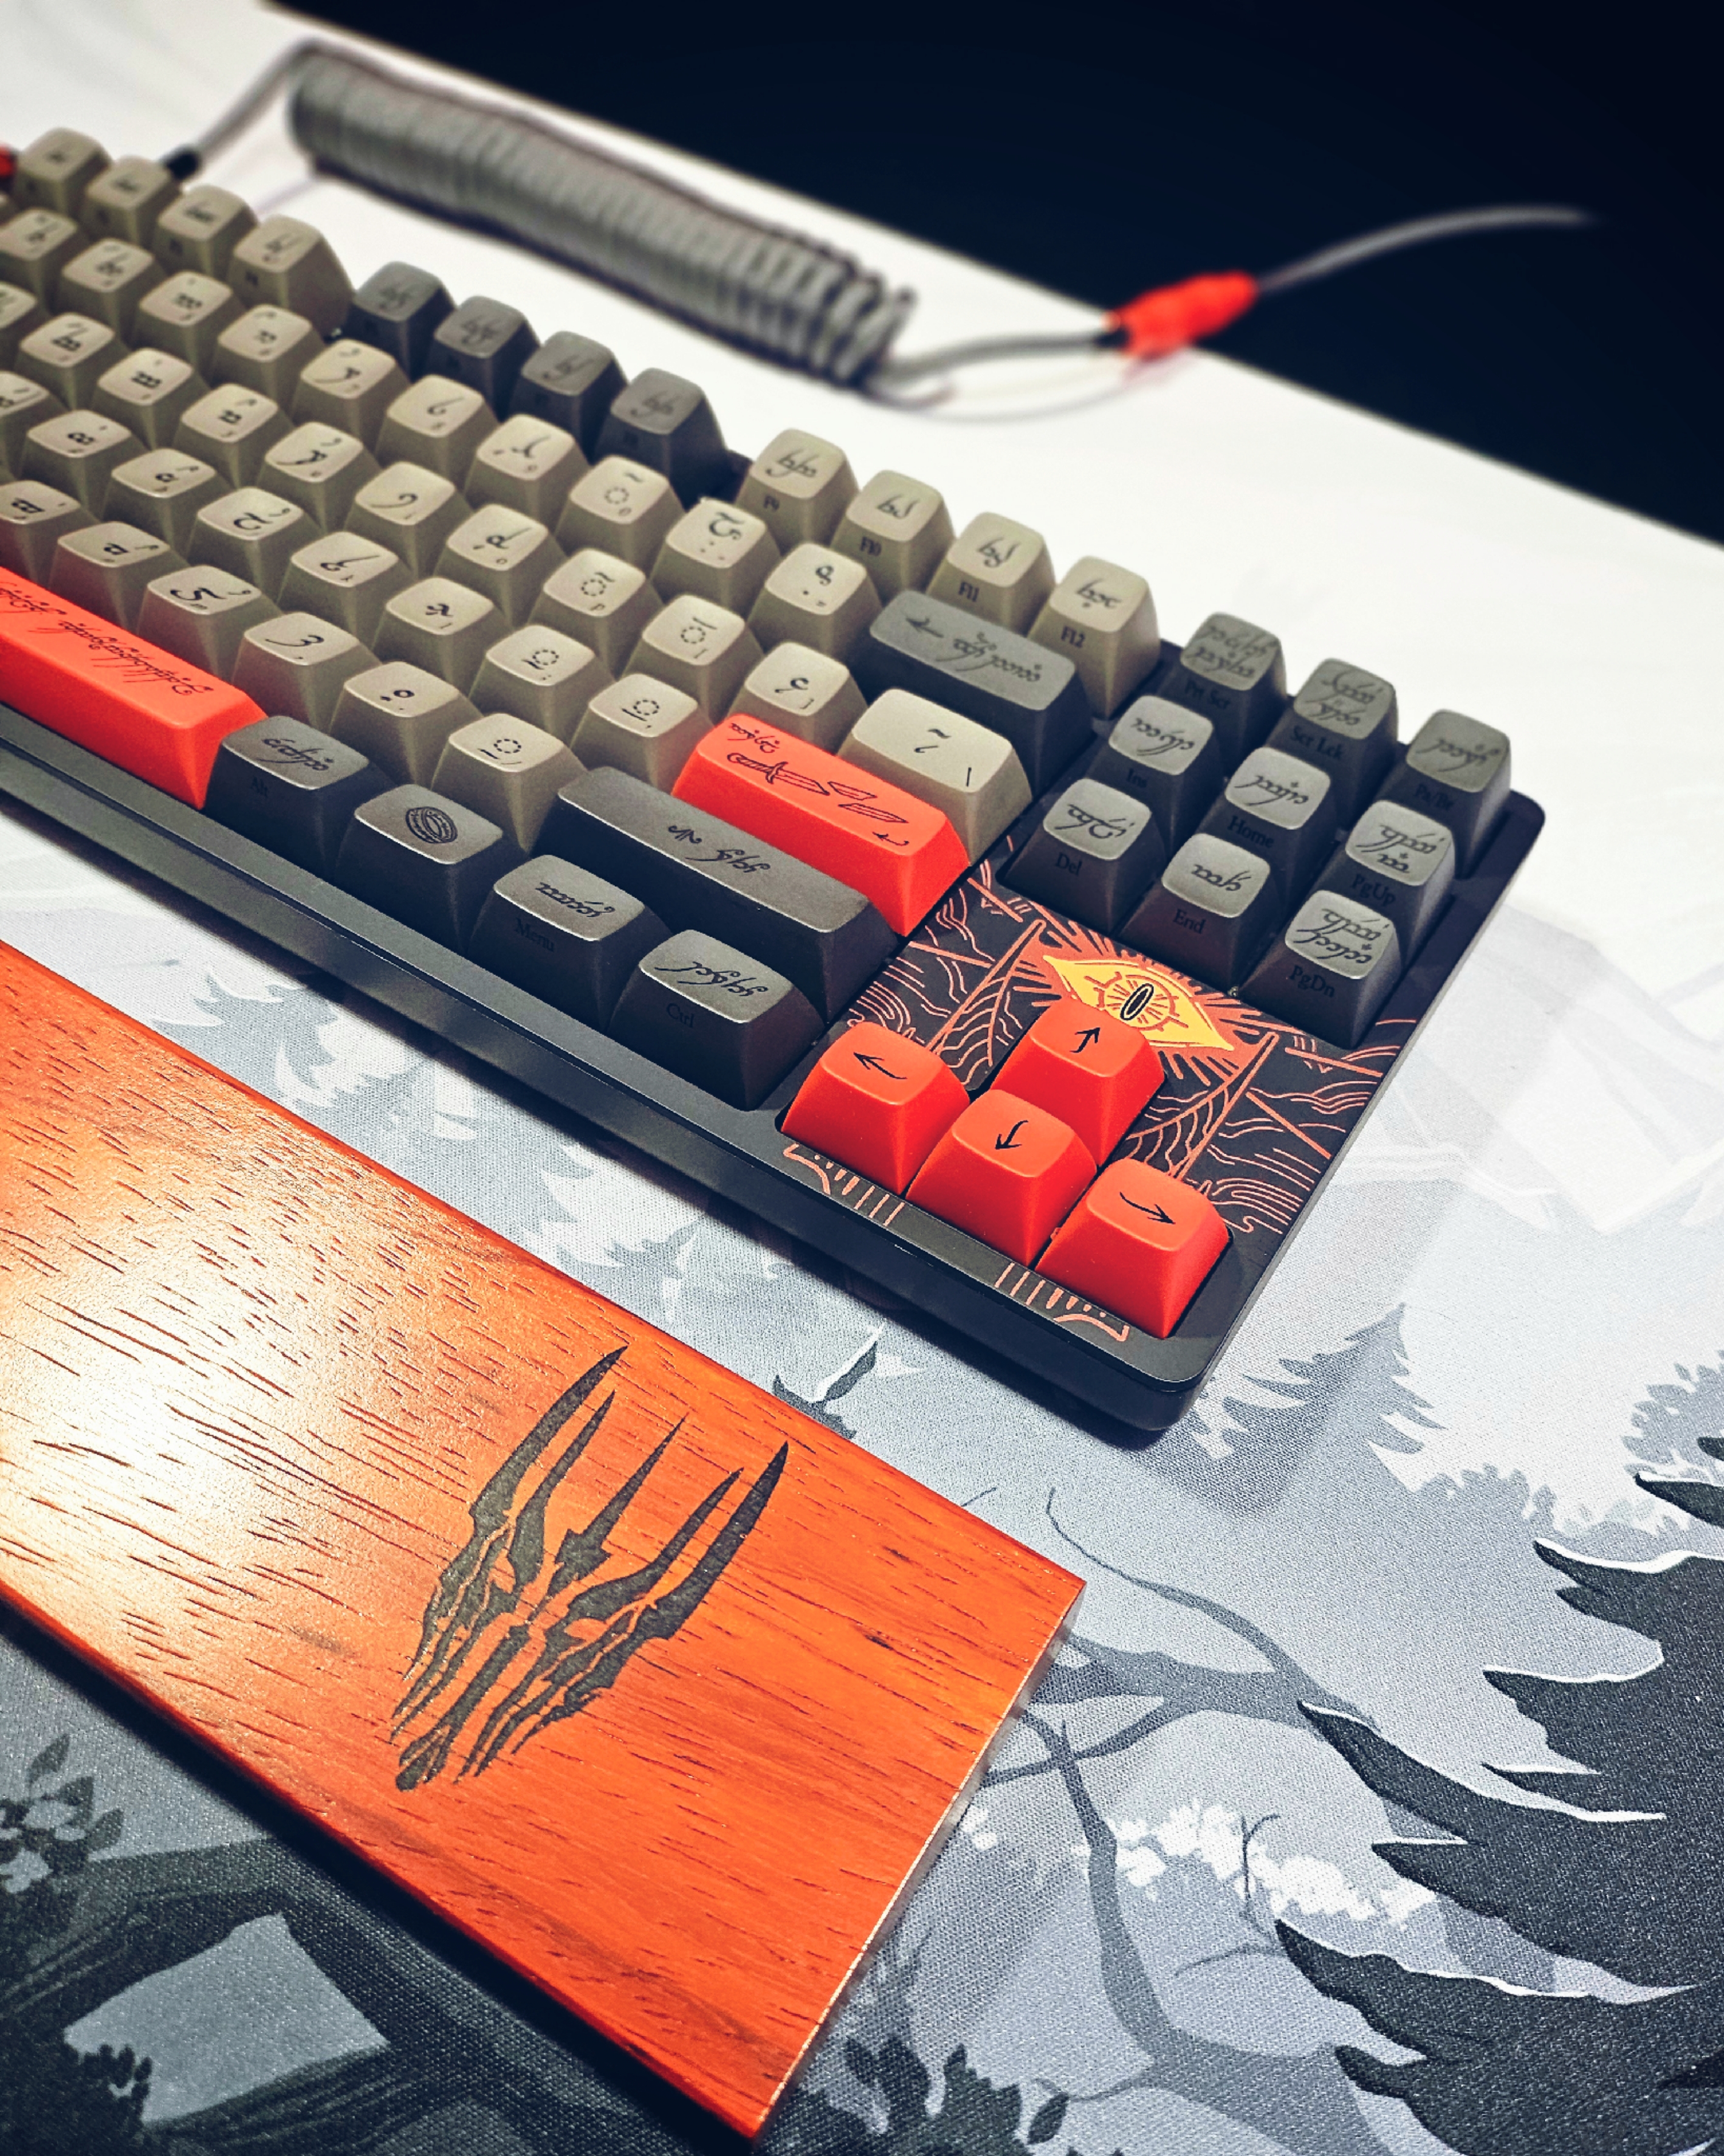
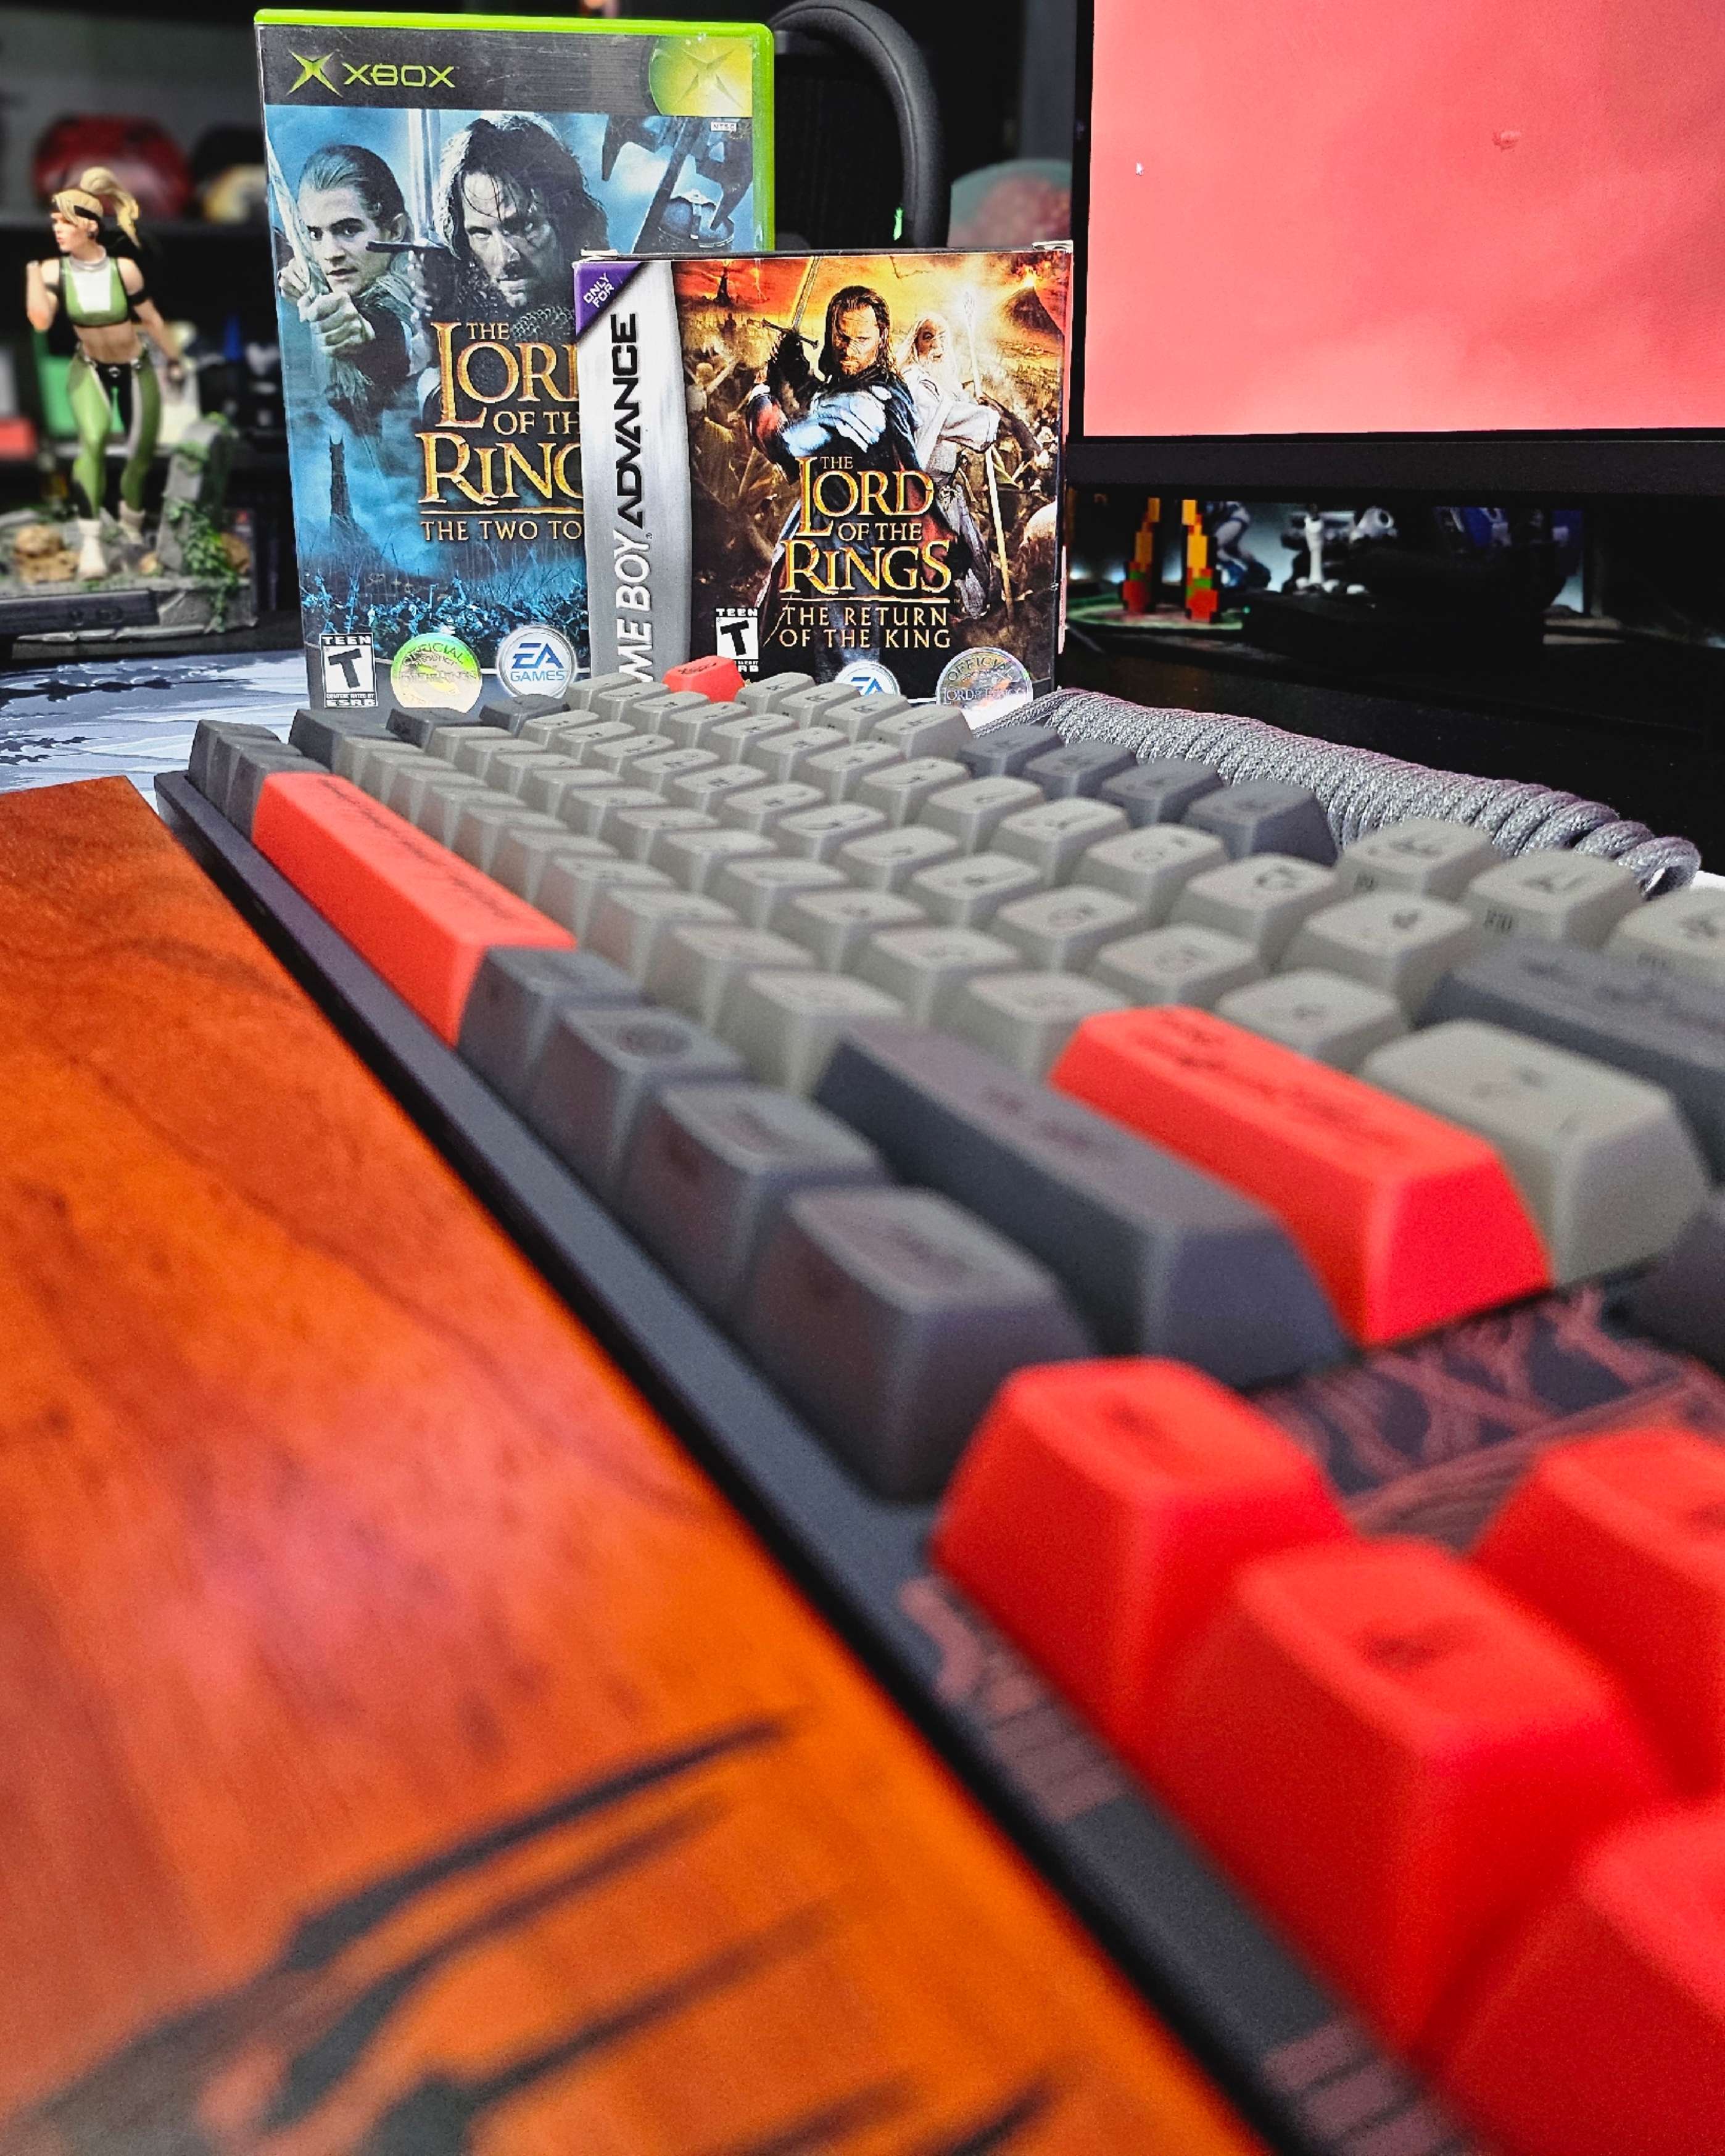
I love The Lord of the Rings. I loved the books as a teenager and was enamored by the movies growing up as a kid. When I saw this collaboration, I felt it was time to switch over to custom keyboards. While the ENTR housing is Drop’s entry-level non-hot swappable switch entry, you can still tell there was effort and quality put into the keyboard. If this is your first keyboard, the loud ping won’t bother you, as there is no pre-installed foam. I had to personally open the keyboard up myself and do a tape mod at the bottom of the bottom plate to reduce the loud ping. Although the switch stabilizers come pre-lubed, the quality of the lube is not optimal. I had to purchase my own and squeeze some down, but overall the stabilizers weren’t squeaky and felt good. Disassembling the keyboard presents a significant challenge. After removing all the caps, I had to undo 16 Torx screws, and the plastic faceplate required further removal. You need a guitar pick to loosen the edges and have to wiggle the center clips loose. Regrettably, the soldered nature of all the switches makes swapping them a laborious task. You’re better off just taking these caps and putting them on another keyboard, but this is an entry-level keyboard. It’s for beginners.
The keyboard’s backlighting surprised me. It does not advertise this anywhere on the box. These LEDs face north and have an off-white color. You can adjust the light or turn it off, making it visually pleasing. I found the Holy Panda X switches pretty satisfying. The keyboard profile is Cherry MX, and I found the keycaps to have quite a pleasing “bowl” shape, feeling them as my fingers were able to be pretty recessed in each key. Sadly, I do have to knock the keyboard down a bit for the loud pinging and no sound dampening. For $200, it should have had this pre-installed. I also found the standard USB-C cable to be pretty lame. The matching YC8 cable would have been nice, as it was available on the website. There is also a matching wooden wrist rest, which I picked up. I sincerely wish they had included this, considering the rest costs only $40. An entire full set would have been great. They also have the artisan keycaps matching each version of the LOTR set.
As for the way the keyboard looks, it’s gorgeous. The Black Speech symbols and typeface on the keys with the English version in small print on the bottom right side of the cap just look outstanding. The keyboard comes with optional accent caps that are red, ; unless you want an all-grey keyboard, these are a must. The addition of Sauron’s Eye to the faceplate near the arrow keys is a delightful touch. I matched this with a desk mat that complemented it, and the result is a sleek and elegant appearance. Drop did an amazing job with this keyboard in both the color scheme and the design of the caps themselves.
For the price, I would have at least expected sound dampening and a better USB cable. The keyboard is also not wireless, so don’t expect that. I did love the weight and feel of this keyboard. It’s not large and oversized like many “gaming” keyboards that are TKL. The bottom of the keyboard features a flip-out stand that allows it to be raised slightly at the back. I would have liked a two-step stand, as it may be too high for some. However, the gorgeous design of the keycaps and faceplate are just phenomenal and if you are a big LOTR fan than you can’t go wrong with this keyboard.
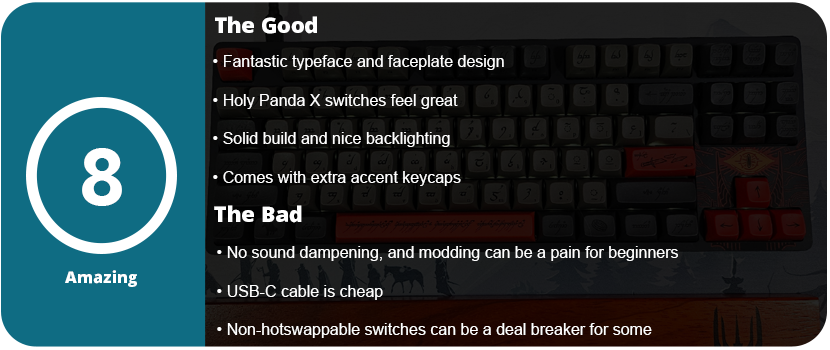
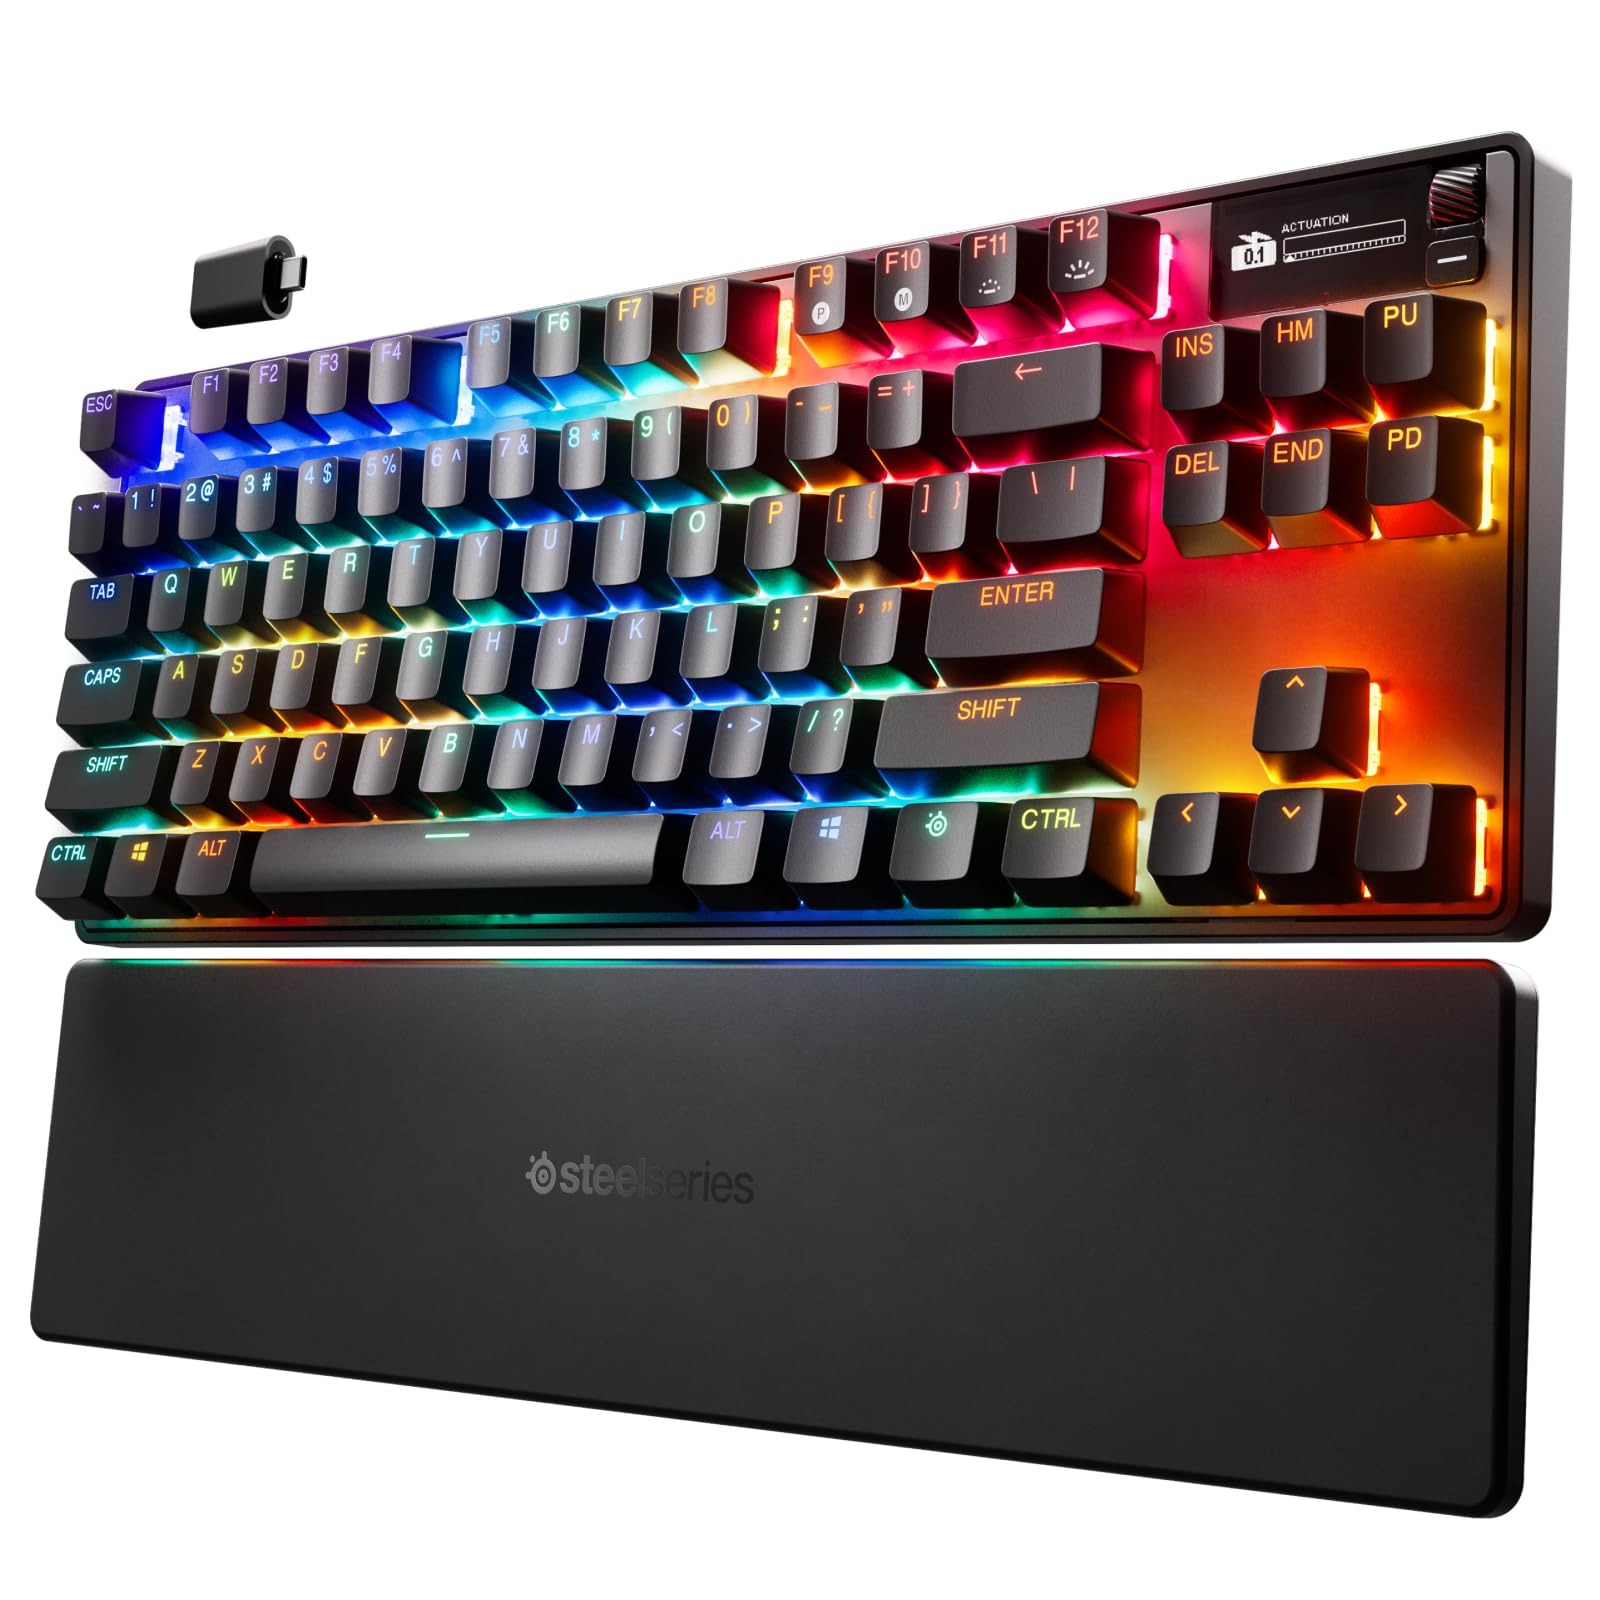
This keyboard features an additional OLED screen. There’s also a premium price tag for this as well as less customizability. I have never owned any SteelSeries products outside of an RGB mouse mat years ago. The packaging was decent, nothing special, and it came with a keycap puller, a USB-C cable, and a USB-C dongle, which was nice. The keyboard also works with Bluetooth, but the software has limitations in this mode. Once I got the keyboard out and the palm rest, I was surprised at how comfortable it was to type on. The biggest gimmick is the screen and their Omnipoint actuation adjustability to change the sensitivity of key presses. No, this isn’t like a DualSense controller in which your key switches get “harder,” but they just become more or less sensitive and register with a stronger keypress or light press. It’s a neat feature, but mostly unnecessary.
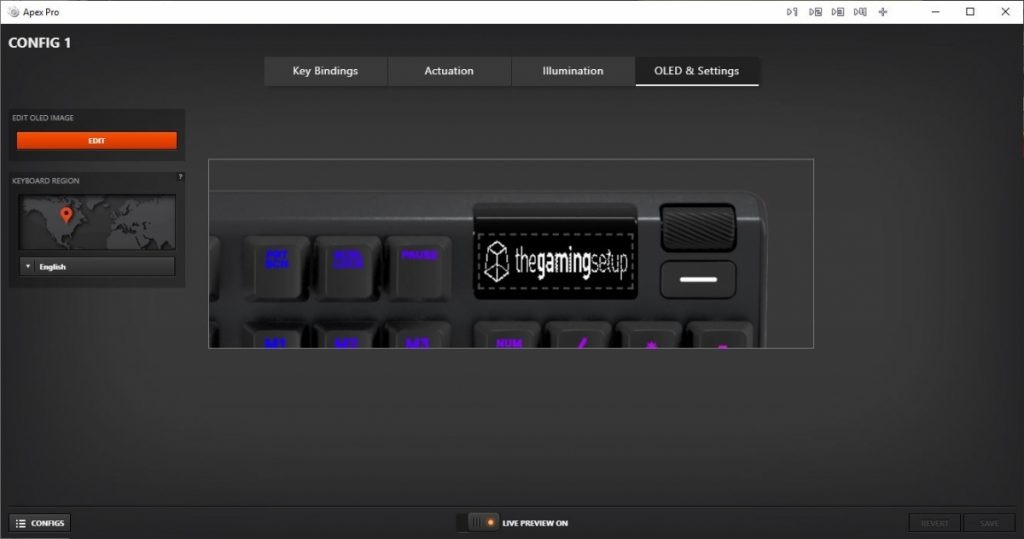
The Omnipoint 3.0 switches felt good to type on, and the foam mod at the bottom of the PCB prevents any ping. I did think the switches lacked a more tactile feel than I’d like, but that’s personal preference. The keyboard itself is unremarkable looks-wise. This keyboard appears to be a standard black “gamer” keyboard, complete with RGB illumination. The black and white two-line OLED display is the only feature that will draw your attention. The display is rather primitive for being OLED and honestly doesn’t do much. Outside of showing your actuation meter, PC temp, GIF animations, and a few app integrations like Tidal (not official Spotify support), there’s not much here. I had the most fun with the GIF animations, but the limited display can’t show anything with detail. You need very chunky 8- or 16-bit graphics for anything to show up well. There isn’t a dedicated repository for GIF animations, with the exception of an Imgur album containing approximately 60 animations that someone has created. Any other support requires using their GameSense SDK, which no one has really made anything for. One individual has created a GameSense Essentials app on GitHub, which merely displays Spotify artist and song information along with a clock. The lack of support is really sad.
I did like the power-saving features, such as the OLED and lights turning off after a certain amount of idle time. However, even with this, the battery went down to 50% in just a few hours of use. You’re lucky if you will get 8-10 hours before the battery dies. This was achieved while using the wireless mode, not Bluetooth. Sadly, the SteelSeries Engine app works fine but isn’t as flashy or robust as Logitech or Razer’s offerings, but at least it works. I found making macros and changing the settings of the actuation rather cumbersome due to flipping through so many screens. The OLED screen options are pitiful, and even just navigating the screen is a chore. There’s a tiny scroll wheel and a button. With the limited app support, this screen doesn’t offer much beyond being there just for the sake of it.
Sadly, this keyboard doesn’t support hot-swappable switches. They are soldered on and only support the Omnipoint switches thanks to the actuation and Rapid Trigger gimmick. This also supports only a select few keys. If you need different actuation on switches, you are better off just buying a custom keyboard with the switches you really want in them. Relying on software drive actuation just isn’t the same. It can come off as just unresponsive to some people. I honestly didn’t notice much of a difference outside of the hardest of key presses. There’s not much play in between. Adjusting individual key actuation is useful for WASD keys or harder keys. There is also a feature to prevent nearby keys from being accidentally pressed.
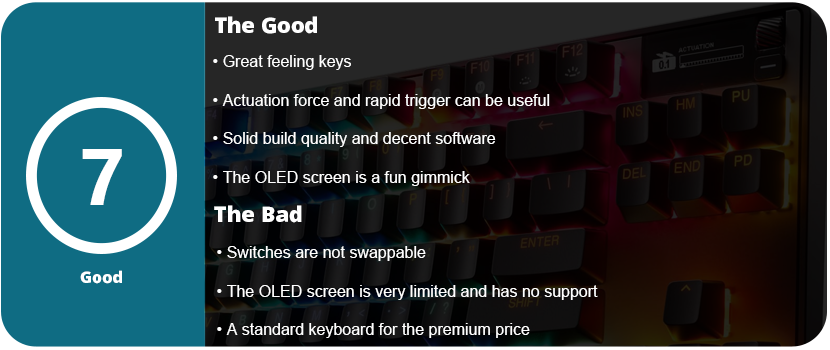
Overall, an underutilized OLED screen and gimmicky, non-replaceable switches contribute to the keyboard’s premium top-tier price. The keyboard’s overall design is a classic black “gamer” keyboard featuring RGB lighting. The software is decent and usable, but the actuation force and rapid triggers feel like gimmicks outside of specific use cases. The keys feel nice, and the sound is dampened, and the palm rest is nice, but overall, you’re better off spending the $270 on a custom keyboard.
I took a long break from Razer products for a while. Razer’s quality has gone downhill over the years, and not to mention, their Synapse software has become bloated, buggy, and just plain awful. I only ever owned three Razer mice, and one was my first ever gaming mouse back in 2009. That mouse in question was the original Naga MMO. I also had the Razer Mamba 2012 and Ouroboros. They all had issues with the laser causing drift, the material wore down fast, and the Teflon feet became uneven in less than a year. I never went with a Razer mouse again. I then tried a headset, Man O’ War (awful after a few weeks), a keyboard, Blackwidow Chroma V2 (not too bad), and I was just never pleased with them. There’s something always off about Razer that just feels icky. If the product works fine out of the box, then the software has issues. If you don’t have software issues, you might have issues with the hardware somewhere down the road. Razer simply manufactures subpar products under the “Gamer” label and then moves on. For the insane premium price they charge, I would expect better.
To wit, I thought I’d give them another shot. At this point, I have mostly moved on from gaming keyboards, as I’m beginning to value key switch feel over aesthetics and RGB. Razer’s RGB is rather decent, and all of their products work with SignalRGB, which is a third-party RGB software I use to control everything. If SRGB doesn’t support it, I won’t use it. The OLED panel on the keyboard was very intriguing; however, I hesitate whenever gaming-branded keyboards have a gimmick. The last keybord I had with a massive gimmick was the Mad Catz Strike 5 keyboard. They are usually mostly useless or are never really supported by anyone or the community. I was also interested in the modularity of this keyboard. More mainstream gaming keyboard companies are trying to embrace the modding community, but it’s a hard community to win over. A lot of these keyboards just don’t have any personality or soul. They don’t feel unique or are too gaudy for the custom keyboard community.
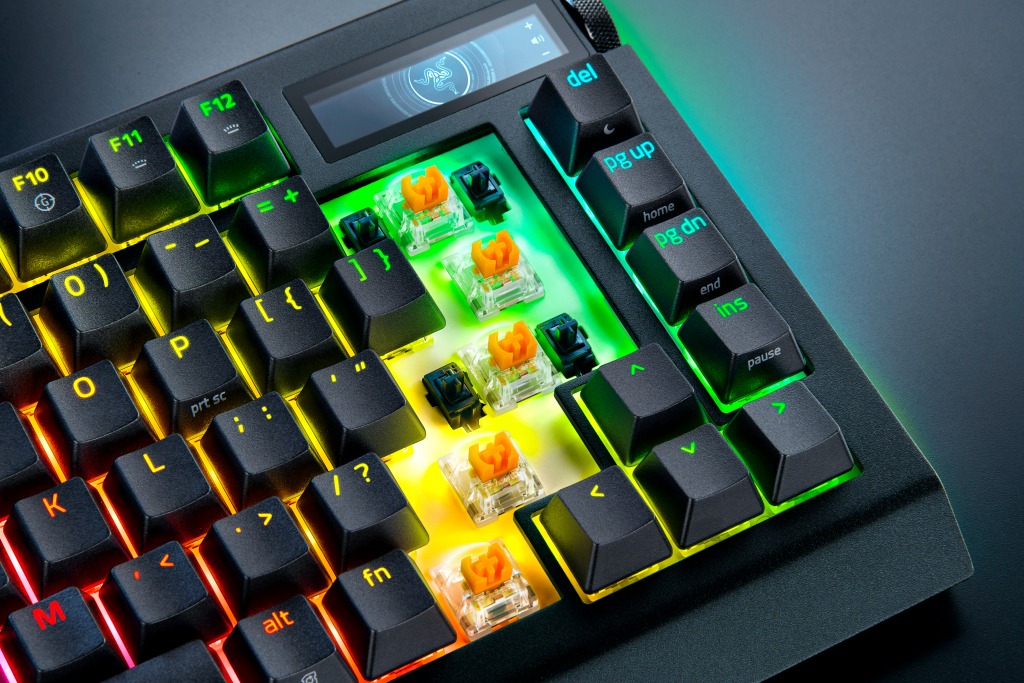
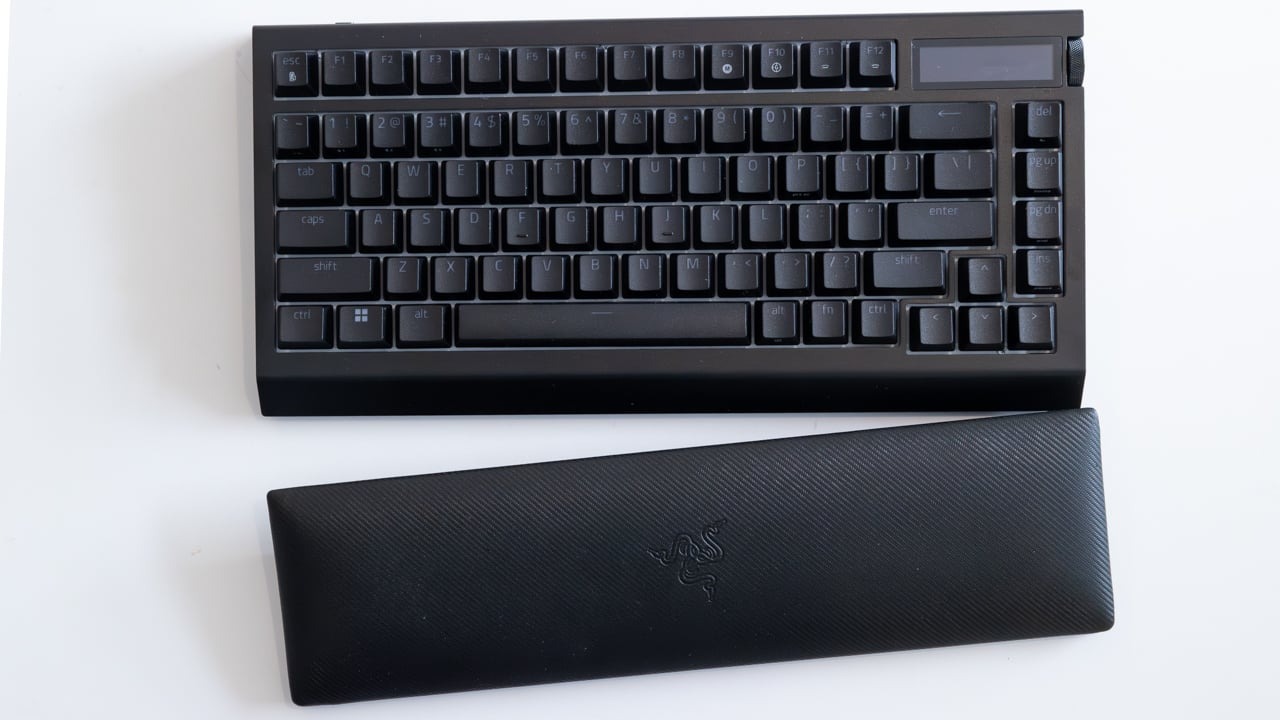
As always, Razer has premium packaging; I can’t fault them there. The keyboard itself has an aluminum body and feels solid and sturdy. It feels great to type on. The switches have a nice tactility, and the foam mod inside the keyboard reduces pinging and enhances the tactile feel of the keys. The Razer Orange Tactile Mechanical Switch Gen 3s aren’t bad. You can swap the switches out for any 3 or 5 pin switches, which is really nice, but with the RGB lighting, you are limited to the type of keycaps you can use. “Backlit” or “Shine-Through” caps are not very popular. You can disassemble and mod the keyboard, but the only benefit is the Razer branding and OLED screen. If you want to take a keyboard apart and mod it, you might as well get a better moddable keyboard for a third or half the price.
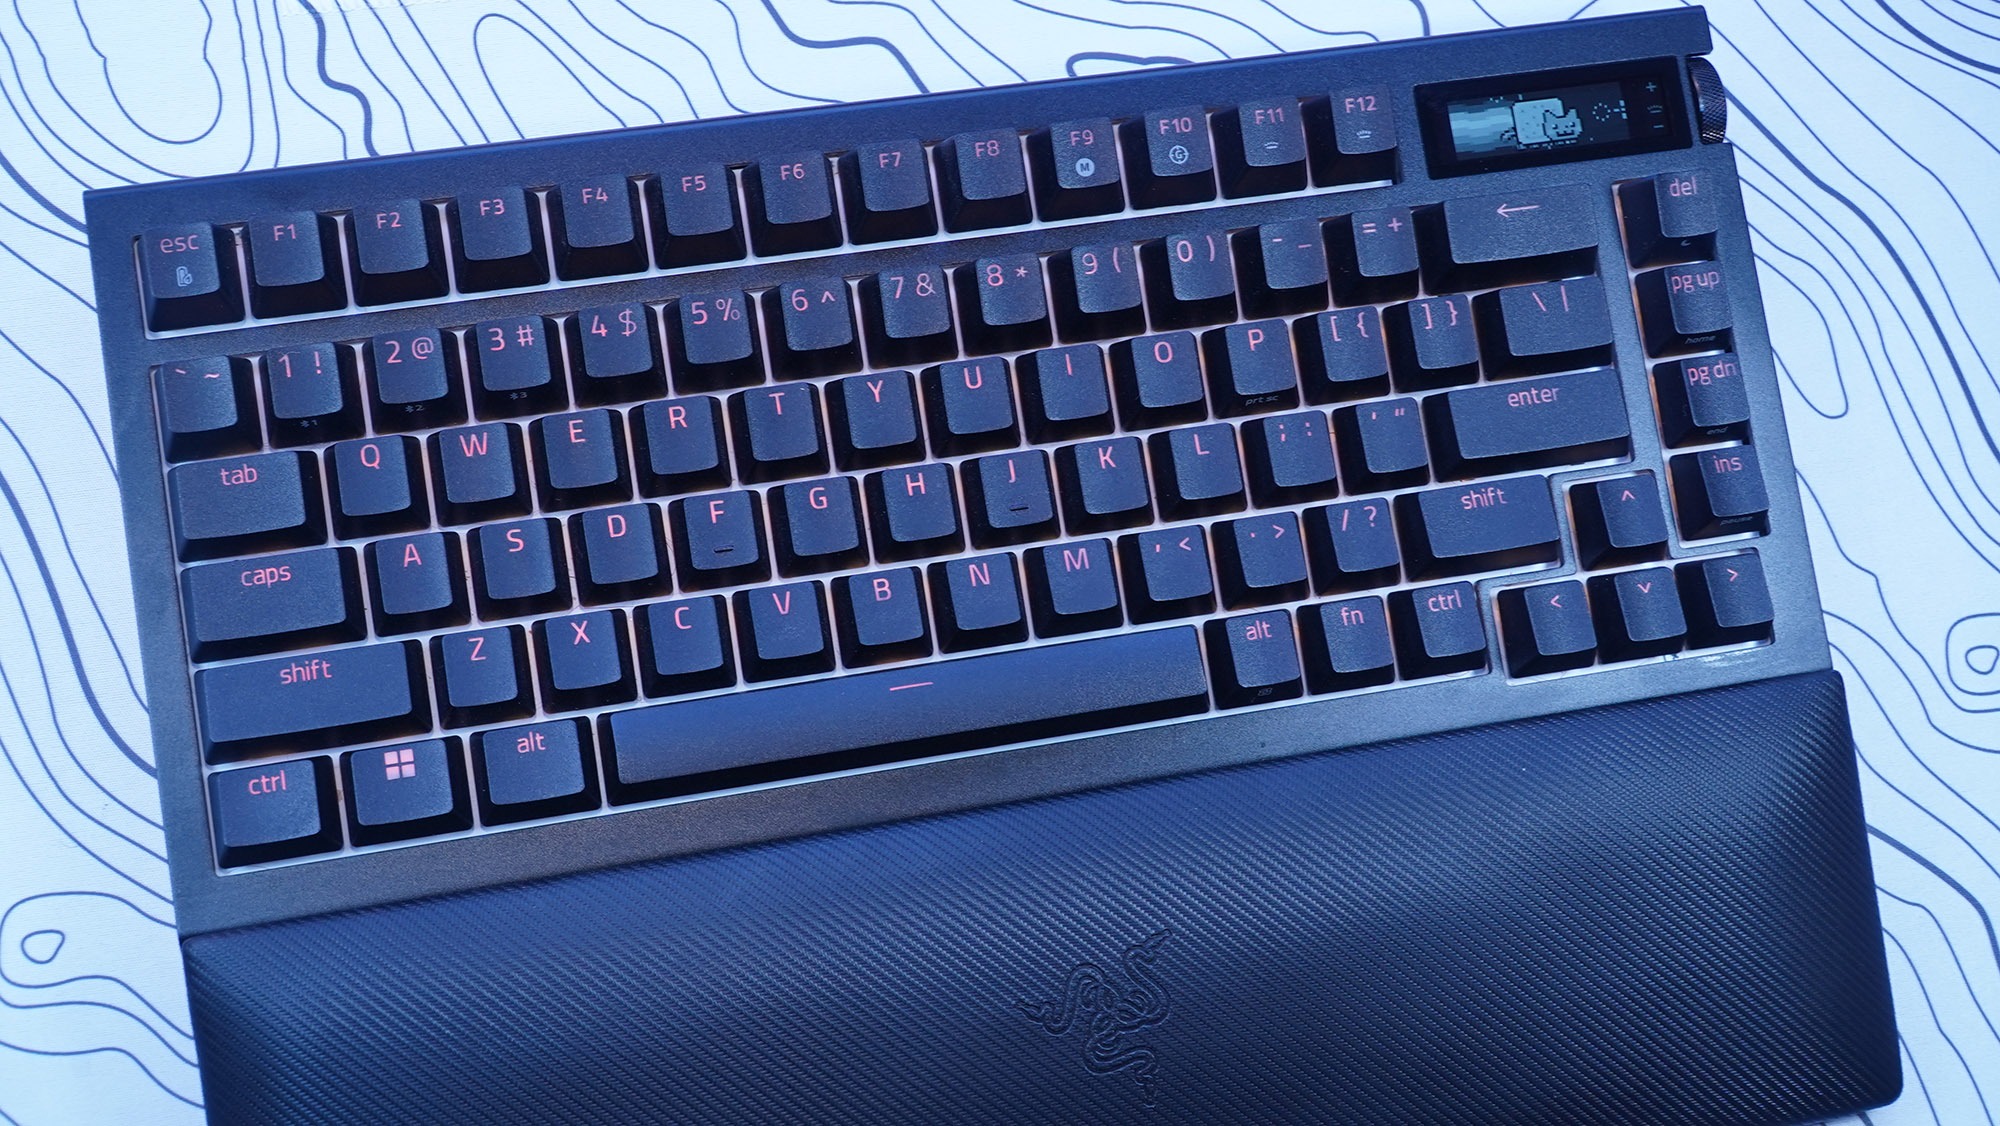
The palm rest is comfortable and plush, and it is magnetic so it won’t slide around on your desk; however, I know this material will wear over time. I’d rather have a harder rubber material instead of the plush. Over time it will fade, discolor from the acid in the oil from your skin, and eventually start tearing and becoming thin. Overall, the design of the keyboard is rather standard and unordinary. It has an all-black finish with black keycaps that looks rather standard. The entire keyboard is nothing special to look at. The OLED screen will catch most people’s eyes. I couldn’t find any specs or resolution on the OLED display, but it is black and white, not color, and has minimal customization and features. What probably accounts for at least $100 of the price tag is, at best, a simple gimmick.
The OLED screen is controlled with a wheel on the side of the keyboard next to the screen that also clicks in. There is also another button below this. You can change the “screensaver” animation and swap between “apps” such as volume control, media control, system info (such as CPU and GPU temperature), keyboard info, and an audio visualizer. This isn’t very impressive given the technology we have today, and it’s an OLED screen. You’re stuck with everything Razer branded. The animation and text banners are generic and all Razer logos. GIF animations can be uploaded to the keyboard, but resolution and size limit them. The keyboard saves only 150 frames. This was the coolest part of the screen, as switching between apps like media controls and the volume got annoying. It’s faster just to use dedicated keys for that. I also could not get the keyboard to read my system info. Overall, the OLED screen is a disappointing gimmick with no support from Razer and no way to customize anything outside of a scrolling text banner and GIF animations. There’s also the battery-eating part. With the OLED screen just on 50% brightness, the keyboard’s battery didn’t last a day. I also had issues with the OLED screen syncing and working on any wireless mode. Synapse would stop syncing things and it would crash. The transfer rate is also really slow for uploading GIFs and most of the time it would time out before an upload would finish.
My biggest issue with this keyboard isn’t the overall lack of impressive features that are already present in custom keyboards. Razer claims to have invented revolutionary features. The damn thing just doesn’t work. It works best in wired mode, but Synapse 4 is an awful piece of software. This keyboard is not compatible with the more stable Synapse 3 software. The keyboard also worked fine in Bluetooth mode, but SignalRGB does not work over Bluetooth due to the bandwidth limitations, and many Synapse features are not available in Bluetooth mode. I wanted to use the keyboard in wireless mode with the 4K Hyperpolling dongle. It never worked. It would continuously disconnect every 2–3 minutes. I spent 4 hours troubleshooting this. I tried reinstalling the Synapse software, deleting all devices in device manager, different USB ports, a USB hub, USB 2.0 and 3.0, front and rear USB ports, a different computer, and updating the dongle and keyboard firmware. If you think of it, I tried it. I also don’t understand how Razer can’t just give us a normal USB dongle. You need to attach a USB cable to this device, which then dangles and flops around on the desk or behind your PC. 8000 Hz polling is also a placebo effect. No one can type that fast or needs that kind of responsiveness. Most people are fine with 1000 Hz polling. 4K is even unnecessary.
This absolute garbage driver issue caused me to return the keyboard, and the fact that this expensive OLED screen is a mere gimmick with no third-party support or seemingly any support from Razer, for that matter. Synapse 4 is also an unwieldy, bloated piece of software trying to advertise so many other Razer software apps that it has acquired. I just cannot believe that the most expensive keyboard I have ever purchased is this bad. Razer really needs to overhaul their product line, fix their software issues, and stop offering gimmicks that most people won’t care about. Sure, you can set macros on the OLED screen and keyboard, but they are unwieldy, and using keyboard commands is much faster than flicking through a screen. Additionally, the keyboard lacks color and rapidly drains the battery. Overall, just stick with whatever keyboard you currently have, as I’m sure it works much better than this overpriced monstrosity.
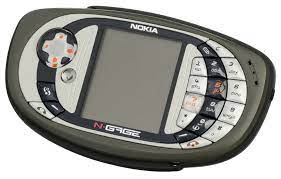
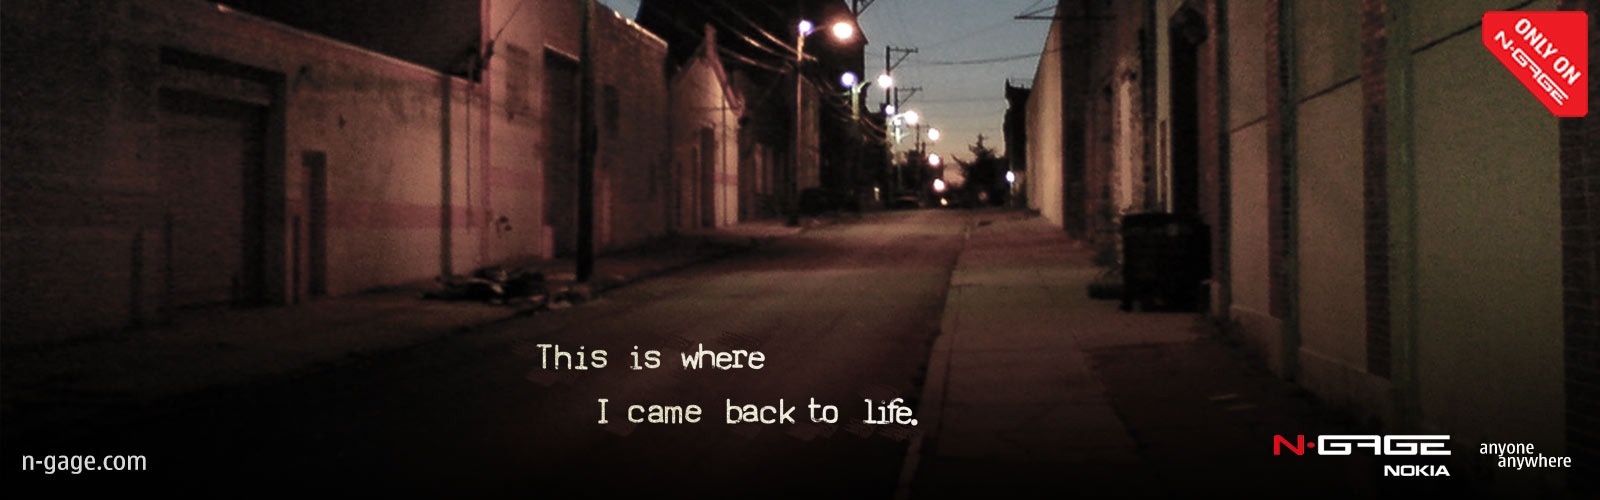
October 7, 2003, was a day to remember or completely forget, depending on who you were. The original N-Gage model sold for $299 ($462 adjusted for inflation) and was a graphical powerhouse on par with the original PlayStation. While the seven original launch titles were all ports from GBA and PlayStation, they ran from very well to questionable, and the system showed a lot of promise. I remember seeing the N-Gage in GameStop as a broke 13-year-old, wishing I could get one. The ads for Ghost Recon, Splinter Cell, SonicN, Tony Hawk, andTomb Raidermade me green with envy. I was envious of all these amazing games that I could play on the go! It was way better than the dumb GBA! Actually, it wasn’t, but Nokia squandered its potential due to the immense power under the hood.
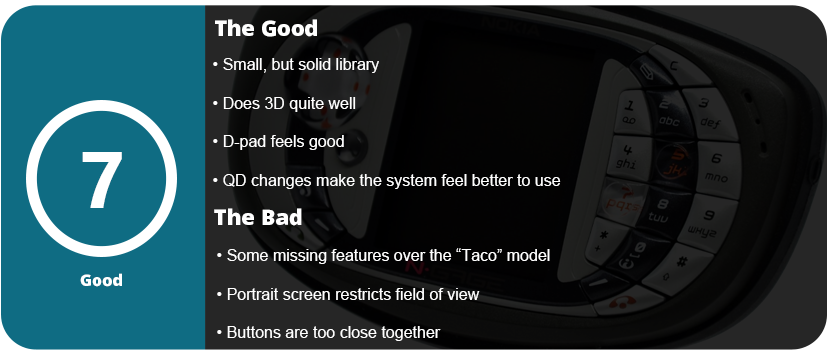
Ultimately, there are great videos on YouTube documenting the system’s history, but in the end, the original model most likely killed the system. The infamous “Taco” phone was sweeping the press and turning gamers off. A former GameStop employee told me that people frequently came in to roast the system and make fun of it when they saw the ads for it. It was the laughingstock of the industry, especially for Nintendo fanboys, and everyone knew it was going to fail. Whether that was accurate at the time remains a matter of debate, but it did not boost sales. They just couldn’t get enough. The portrait screen also turned off many users, necessitating manual customization of most games for the experience. Released just 7 months after the Taco model, the QD lacked features such as a USB port, MP3 playback, dual-band antenna instead of tri-band, and the same operating system, even though Symbian 7.0s had already been out before the QD’s release. This implies that gamers continued to rely on 1st generation Symbian games for content beyond the N-Gage library.
So what’s the QD experience like? It was frustrating, to be honest, but in the end, I grew fond of the little system. I have created a comprehensive guide explaining how to begin the collection process and set up the system, but it’s not an easy task. You need a standard-size SIM card, an MMC memory card (not made anymore), and a card reader for it. The N-Gage library is rather expensive to collect, with many going for $50+. There are a ton of great games available for the N-Gage. In fact, in its sad 65-game library, there are more good games than bad.
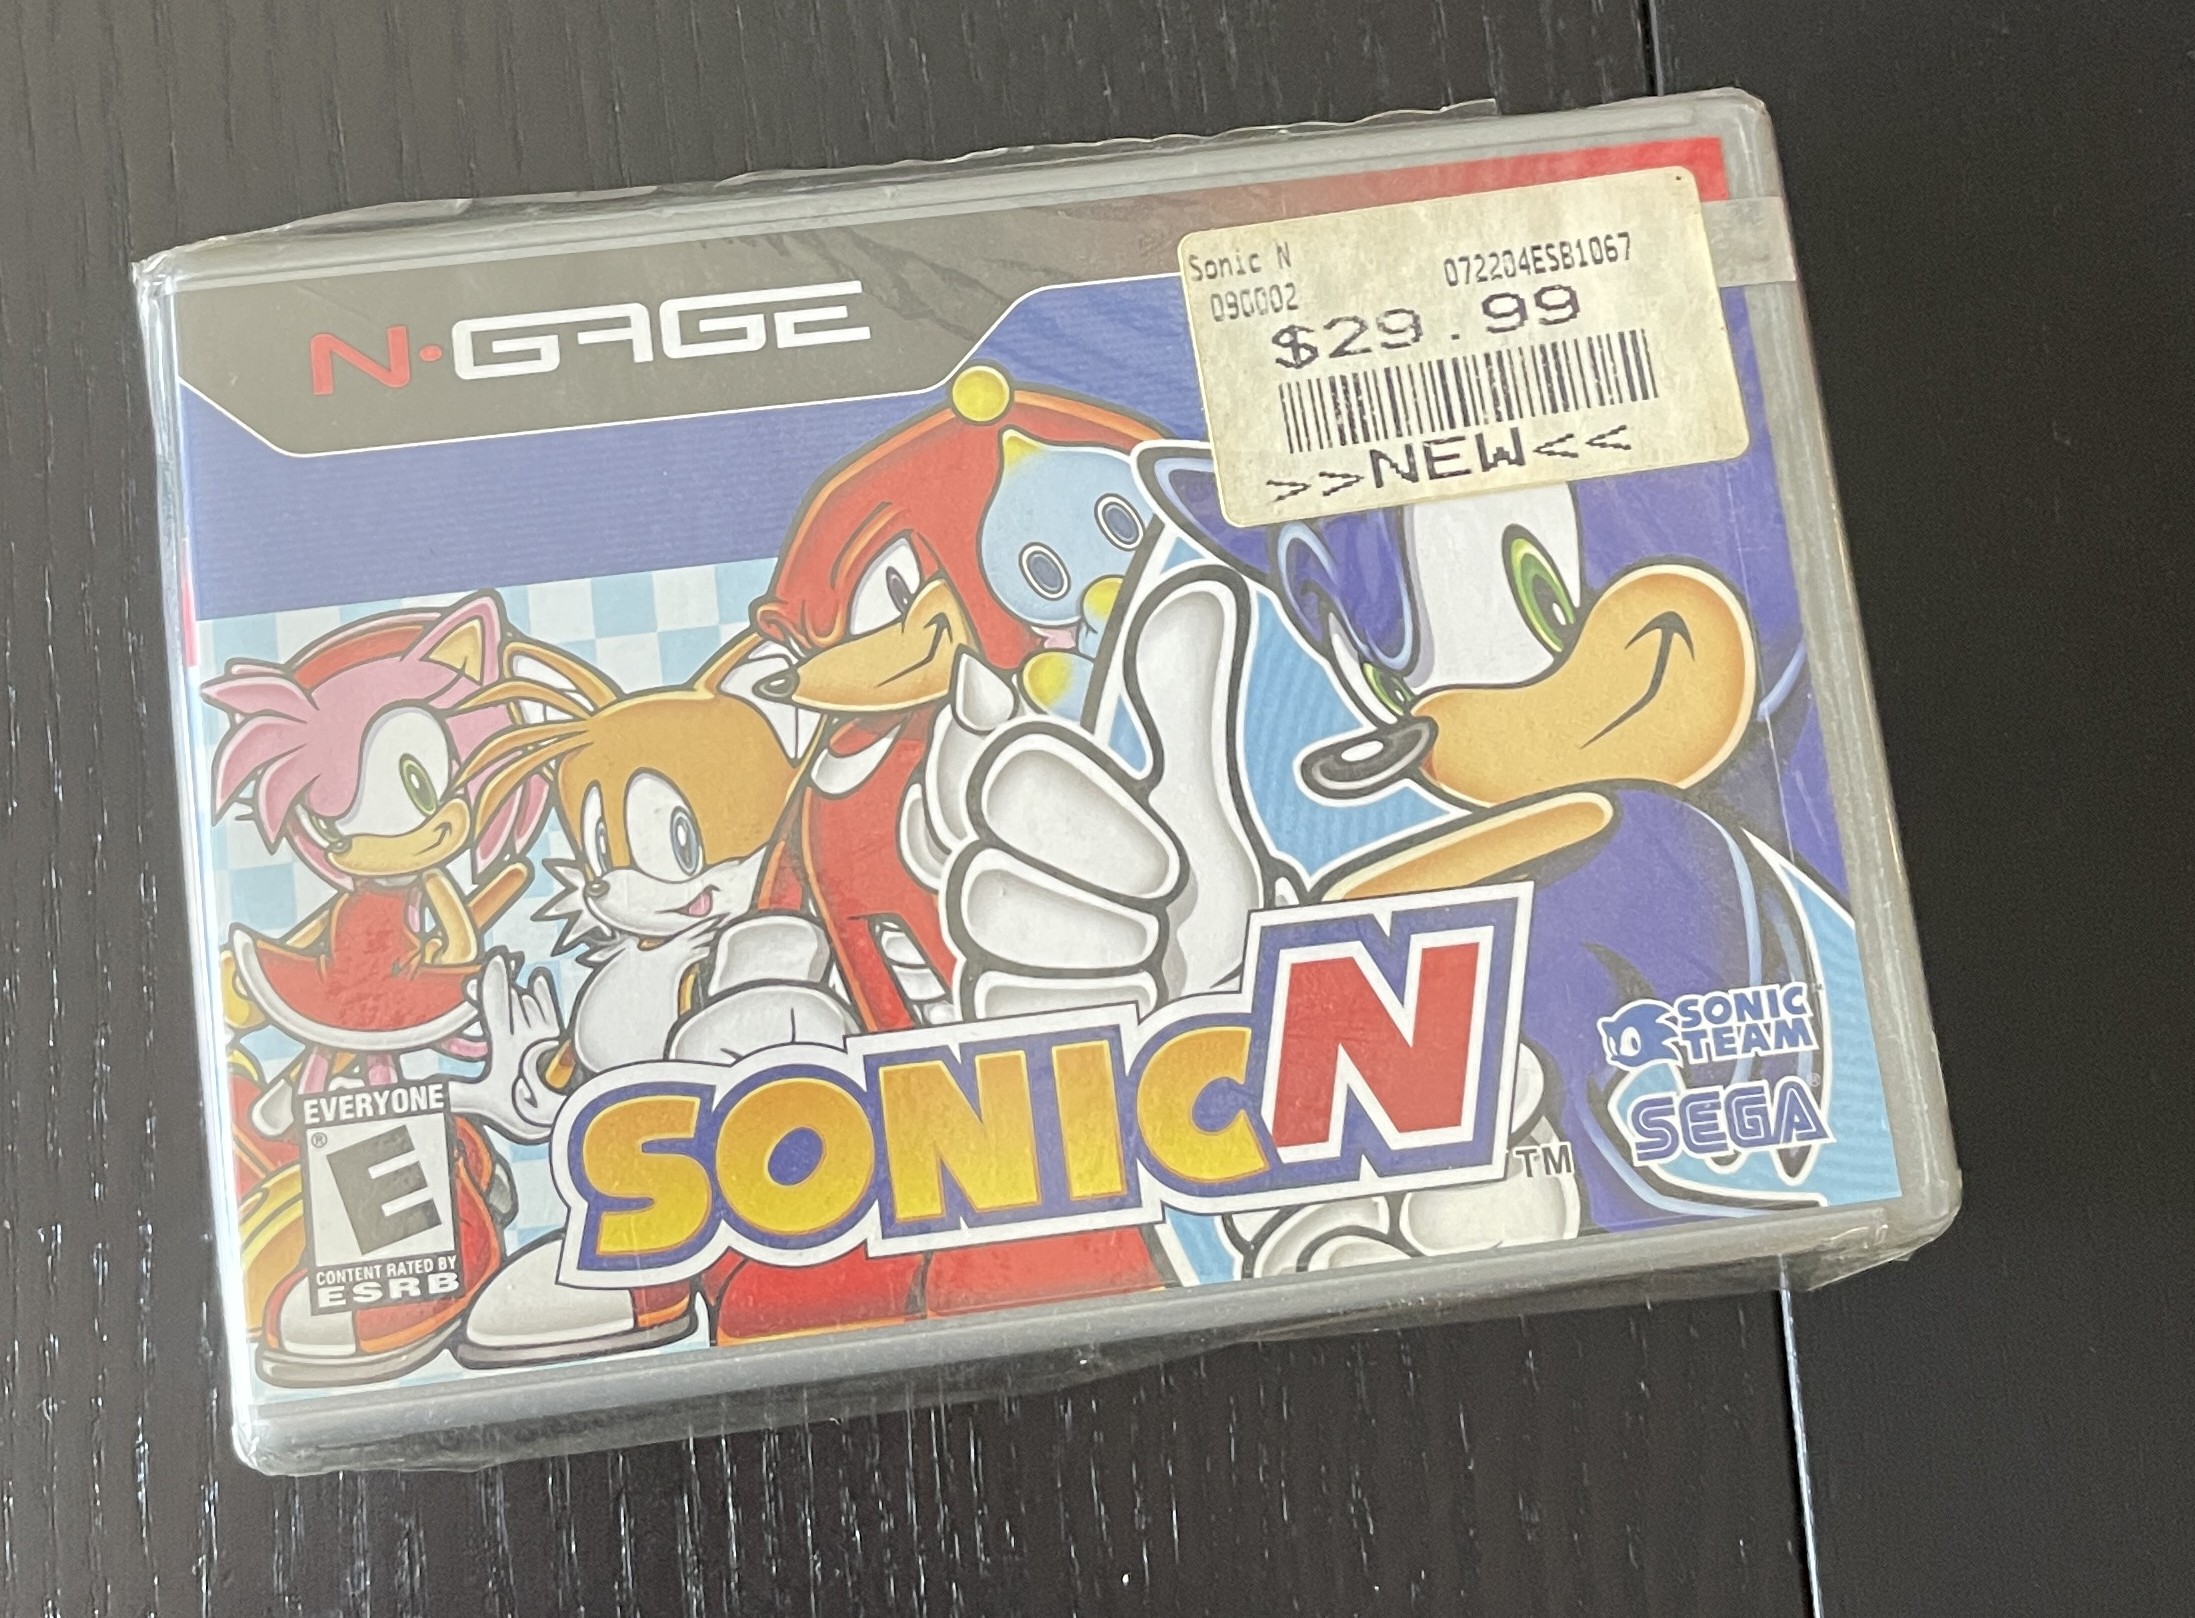
A new copy of SonicN sold by GameStop that I purchased
Physically, the QD feels good in the hands. It features a thick rubber bumper around the entire outer edge. The top sports a rubber stopper with the headphone jack and charger port, and the bottom has one for the card slot. These stoppers are a serious pain! They were always intended for older cell phones. Usually, the stoppers for the charging port or headphone jack will eventually tear and break. If you have a large N-Gage library, you’re going to eventually rip these stoppers. Maybe hard plastic would have been better, but this is a budget re-release, so I digress. The back has a removable battery door, and underneath is a spot for the SIM card. The front features a D-pad and various menu navigation and selection buttons on the right, as well as the standard numpad on the left. There are two raised buttons (5 and 7) that function as “game buttons.” You also get an orange backlight. The screen is a backlit 2.1″ TFT LCD at 176×208 resolution and looks pretty decent. At least it’s backlit, which is a nice touch.
In terms of software, the OS itself offers minimal customization options. It’s a standard affair, with the only customization being the wallpaper for the home screen and welcome screen. This is about all you could do on your phone back in the day. There isn’t even an option to customize the ringtone, really. The only special thing about this phone is the form factor and the unique game library, in which there are many awesome games available. If you can get an MMC card up and running, you can play cracked games since the library is so expensive.
How does it feel to actually play the games? Well, it’s a bit awkward at first as the face buttons are so close together. While the 5 and 7 keys have a distinct height, I can still easily hit other buttons, and the D-pad feels surprisingly comfortable. You can roll your thumb around it easily enough. I think shoulder buttons or a push-out keyboard could have helped here. But let’s get to the true reason why anyone would want this. The games. How do they feel and play?
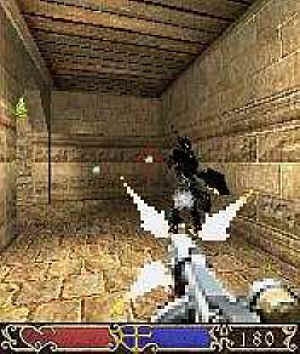
They vary greatly. Sadly, the system didn’t have a long enough life to really iron out the kinks and let developers hone their tools. Some games feel great on the system, like they were hand-tailored, while others feel completely shoe-horned in just to make a quick buck on some hype. The N-Gage isn’t anything special in that regard. The N-Gage received the same treatment as every other console. The portrait screen is probably the system’s biggest fault. Although developers can adapt control schemes to the screen, they must completely tailor games to the orientation. No other console has ever done this before, unless you count the Vectrex or something else. Either stick to widescreen (16:9) or 4:3. Heck, even 1:1 would have worked just fine. I also wish the screen was a little bigger. Even a mere inch would suffice. There’s plenty of detail here, as the TFT LCD is pretty nice for the time period, but that orientation really narrows your field of view.
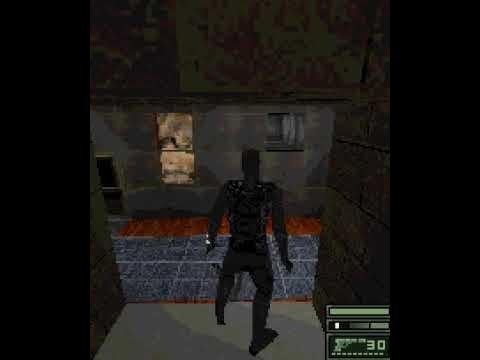
When it comes to performance, the N-Gage did pretty okay in 3D. It is certainly better than the Gameboy Advance, but not as good as the PSP or even the DS. Games that seem like they were really well adapted ran fine on the system with a little slowdown, such as Ashen, but other games like RedFaction and Tomb Raider run at a sub-30 FPS most of the time. However, some games, such as Tony Hawk’s Pro Skater, consistently run at 60FPS or even higher. While control schemes with a few buttons work well on the system, anything that requires the entire keypad can get cumbersome due to the layout. Ashen requires the whole keypad, including buttons, to free-look. While it certainly works and takes some getting used to, it’s not ideal at all. It’s the same issue the PSP had with no second analog nub.
Nokia aggressively promoted their N-Gage Arena online gaming, which bore a striking resemblance to Xbox LIVE. This allowed for multiplayer via cellular or Bluetooth connections. Although I am unable to test it at this time, my research indicates that it functioned reasonably well as long as you had adequate coverage in your location. It also depended on the game’s specific net code. I can imagine this being a big deal back in the day, as there weren’t any online wireless portable gaming systems like we have now. The only other portable system to offer cellular online play would be the 3G PlayStation Vita almost a decade later, which bombed spectacularly. Interestingly, the N-Gage Arena launch page remains active as of this writing, but all other links within are inoperable. After the N-Gage devices died out, the N-Gage gaming service survived for a few more years, ending up on their higher-end N-series phones. These were the last Nokia Symbian-based phones before smartphones took over. The N-Gage 2.0 was more of a gaming device than a completely new gadget. These only ran on higher-end phones, such as the N95 (mine pictured below). Games such as Metal Gear Solid Mobile were large names that would hopefully make mobile devices a serious gaming platform. Regrettably, this realization came too late.
Overall, the N-Gage QD was the system that should have been out at launch. While it doesn’t feel as well-built as the original model and cuts some features, it makes gaming on the thing—which was the main marketing push for it—better and just more accessible. Better buttons, easier access to the game slot, a smaller form factor, and just a few other tweaks were enough to consider this version the definitive N-Gage experience, but it was too little, too late. Indeed, the N-Gage library boasts a surprisingly robust selection of games, surpassing the quality of many “failed” systems. Released at the height of the handheld era, the N-Gage faced inevitable failure due to the dominance of the GBA, rumors of new handhelds from Nintendo and Sony, and its eventual higher price compared to both systems. The exclusion of children from the market due to the need for a cell phone and a talk plan further increased the cost, a burden that parents were unwilling to bear. The much cheaper Game Boy Advance was a better alternative. If Nokia had released a game-only version at a price that was more than half the original price and made some adjustments, it might have been a more viable option. Who knows? But it’s still worth having in your collection.
Phone controllers have come a long way. Gone are the days of clip-style controllers or external clips that snap on to Xbox controllers. We finally get dedicated, high-quality telescoping controllers that feel like a premium console controller. The Backbone has been at war with the Razer Kishi for a couple of years now, and so far, the Backbone has remained king of the phone controllers. The licensing partnership with PlayStation just drives home how much they want console gamers on their phones.
The backbone feels incredibly sturdy in the hands. The buttons are precisely where they should be, and the thumb sticks have a great feel. The software is actually quite interesting, and it is one of the better game launcher apps that supports Backbone natively. With a full list of controller-compatible games, you can launch them from the app without any issues. Here, you can also adjust a few settings and check for firmware updates. It’s miles better than Razer’s app for the Kishi.
This is the single best dedicated mobile controller I have ever used. We have made significant progress since the early 2010s, when Wish and AliExpress offered subpar controllers. Even the Moga controllers were pretty bad. Remember the iPega series of Chinese controllers? The PG-9023 was one of the most popular controllers up until Moga started taking over the market, and then PS4 and Xbox One controllers took over. This controller feels as though it could have been designed by Sony itself. The buttons feel premium; they don’t have obnoxiously loud clicks; the analog sticks aren’t stiff or overly sensitive; and the hand ergonomics are just right.
The backbone can fit phones as large as they come, and it doesn’t have the Kishi’s weird folding design. It doesn’t fold down as far, but it’s small enough to fit into a bag without taking up much room. Overall, the Backbone One is a fantastic controller, made even more so with the PlayStation branding. This fits right alongside all of your PS5 accessories.
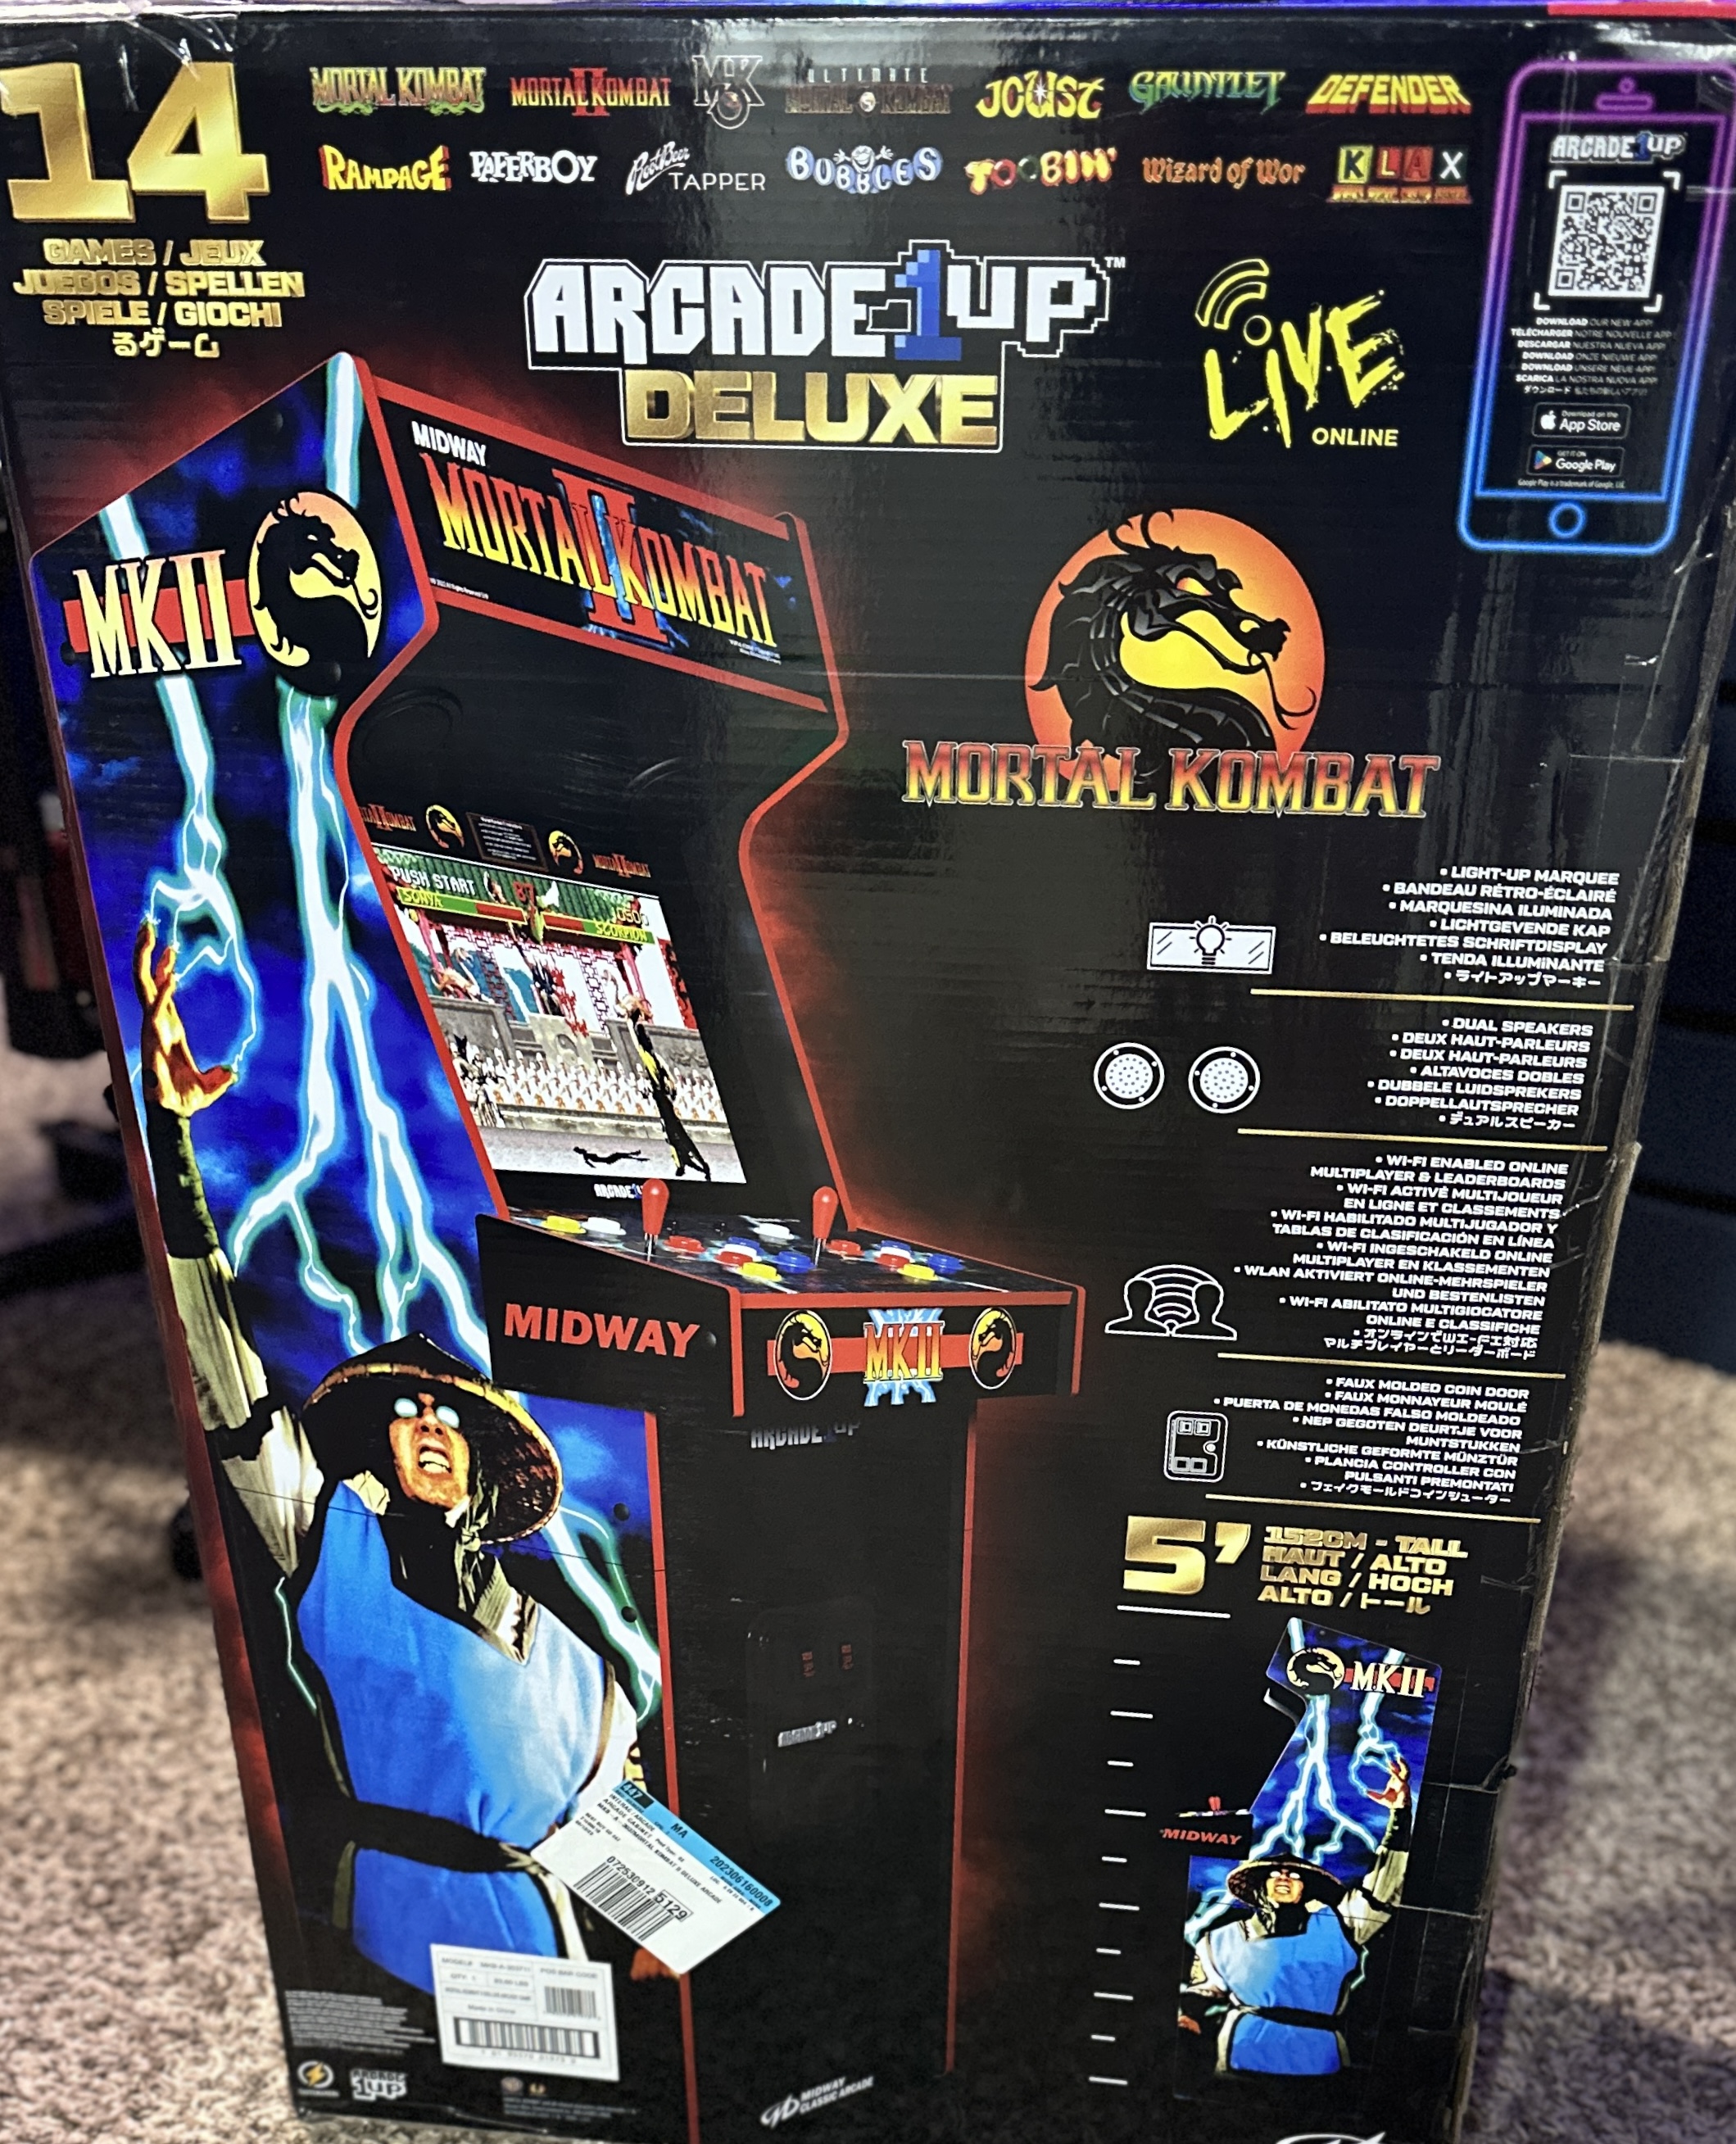
1UP Arcade has done an excellent job bringing scaled-down cabinet replicas to our house. Some negative arcade enthusiasts may criticize these cabinets, but their quality has improved over time, and for the majority of us, they are the only affordable, suitable, and accessible options. I had the original Mortal Kombat II Costco arcade cabinet, but it severely malfunctioned beyond repair, having no sound or control input anymore. Replacing the board would have cost nearly as much as a new cabinet, so I decided to buy the upgraded version.
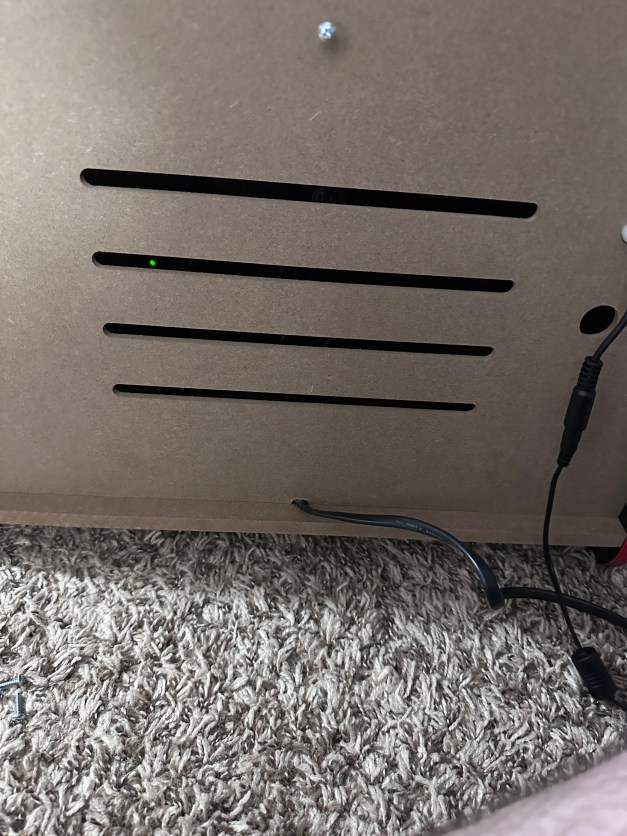
This cabinet isn’t just an upgrade; it’s Mortal Kombat II 2.0. 1Up has completely redesigned the entire cabinet from the ground up, incorporating more Midway games, online play, and numerous improvements over the years. For starters, there is no need for the silly riser anymore. While the artwork was nice, it made the cabinet not look as authentic as it could. Additionally, the cabinet features top-mounted downfiring speakers, and the marquee seamlessly integrates with the side panels instead of appearing as a flat banner across the top. The screws now have black screwhole covers, so I had to buy black screws for the original cabinet because this wasn’t thought of. There is a faux coin door in the front, and overall, it looks a lot closer to the original design.
I made slight improvements to the buttons and joysticks, but I still replaced them with Suzzo Happs and Cherry microswitches. The LCD is of much higher quality, with better color and contrast. I also modified my system to add a subwoofer at the bottom of the cabinet for more bass. While the stereo speakers sound better than the original mono speaker cabinet, there is no bass. I installed a low-cost soundbar on the top of the previous cabinet, but it merely amplified the audio rather than suppressing the internal speaker. With the subwoofer added, the cabinet rumbles and shakes, becoming as loud as a regular arcade cabinet, and it’s glorious. This is a cheap option, and you can add any old PC subwoofer you have lying around.
This time around, installation takes longer due to a more solid design with more wood and cross beams to support the rear, control panel, and marquee area. It feels significantly more solid, and as I assembled it, I noticed that it also weighs more. This is a sturdy cabinet that can take a good knocking and rough play, while the original had thinner wood and felt more delicate. Playing the actual games is what matters most, and there’s no disappointment here. All four MK games play just like they did in the arcades and feel great. The addition of the other Midway games is a huge bonus, and you can upload and track your high scores, which adds replay value to these games.
Overall, while I’m no arcade expert, I can safely say that this cabinet is worth the full purchase to replace your old one. You can either gift it to a friend or your kids, or sell it and purchase this new cabinet instead. It is easier to mod, has higher-quality parts all around, and the bonus of online play, software updates, and more games outside of Mortal Kombat adds to that value.
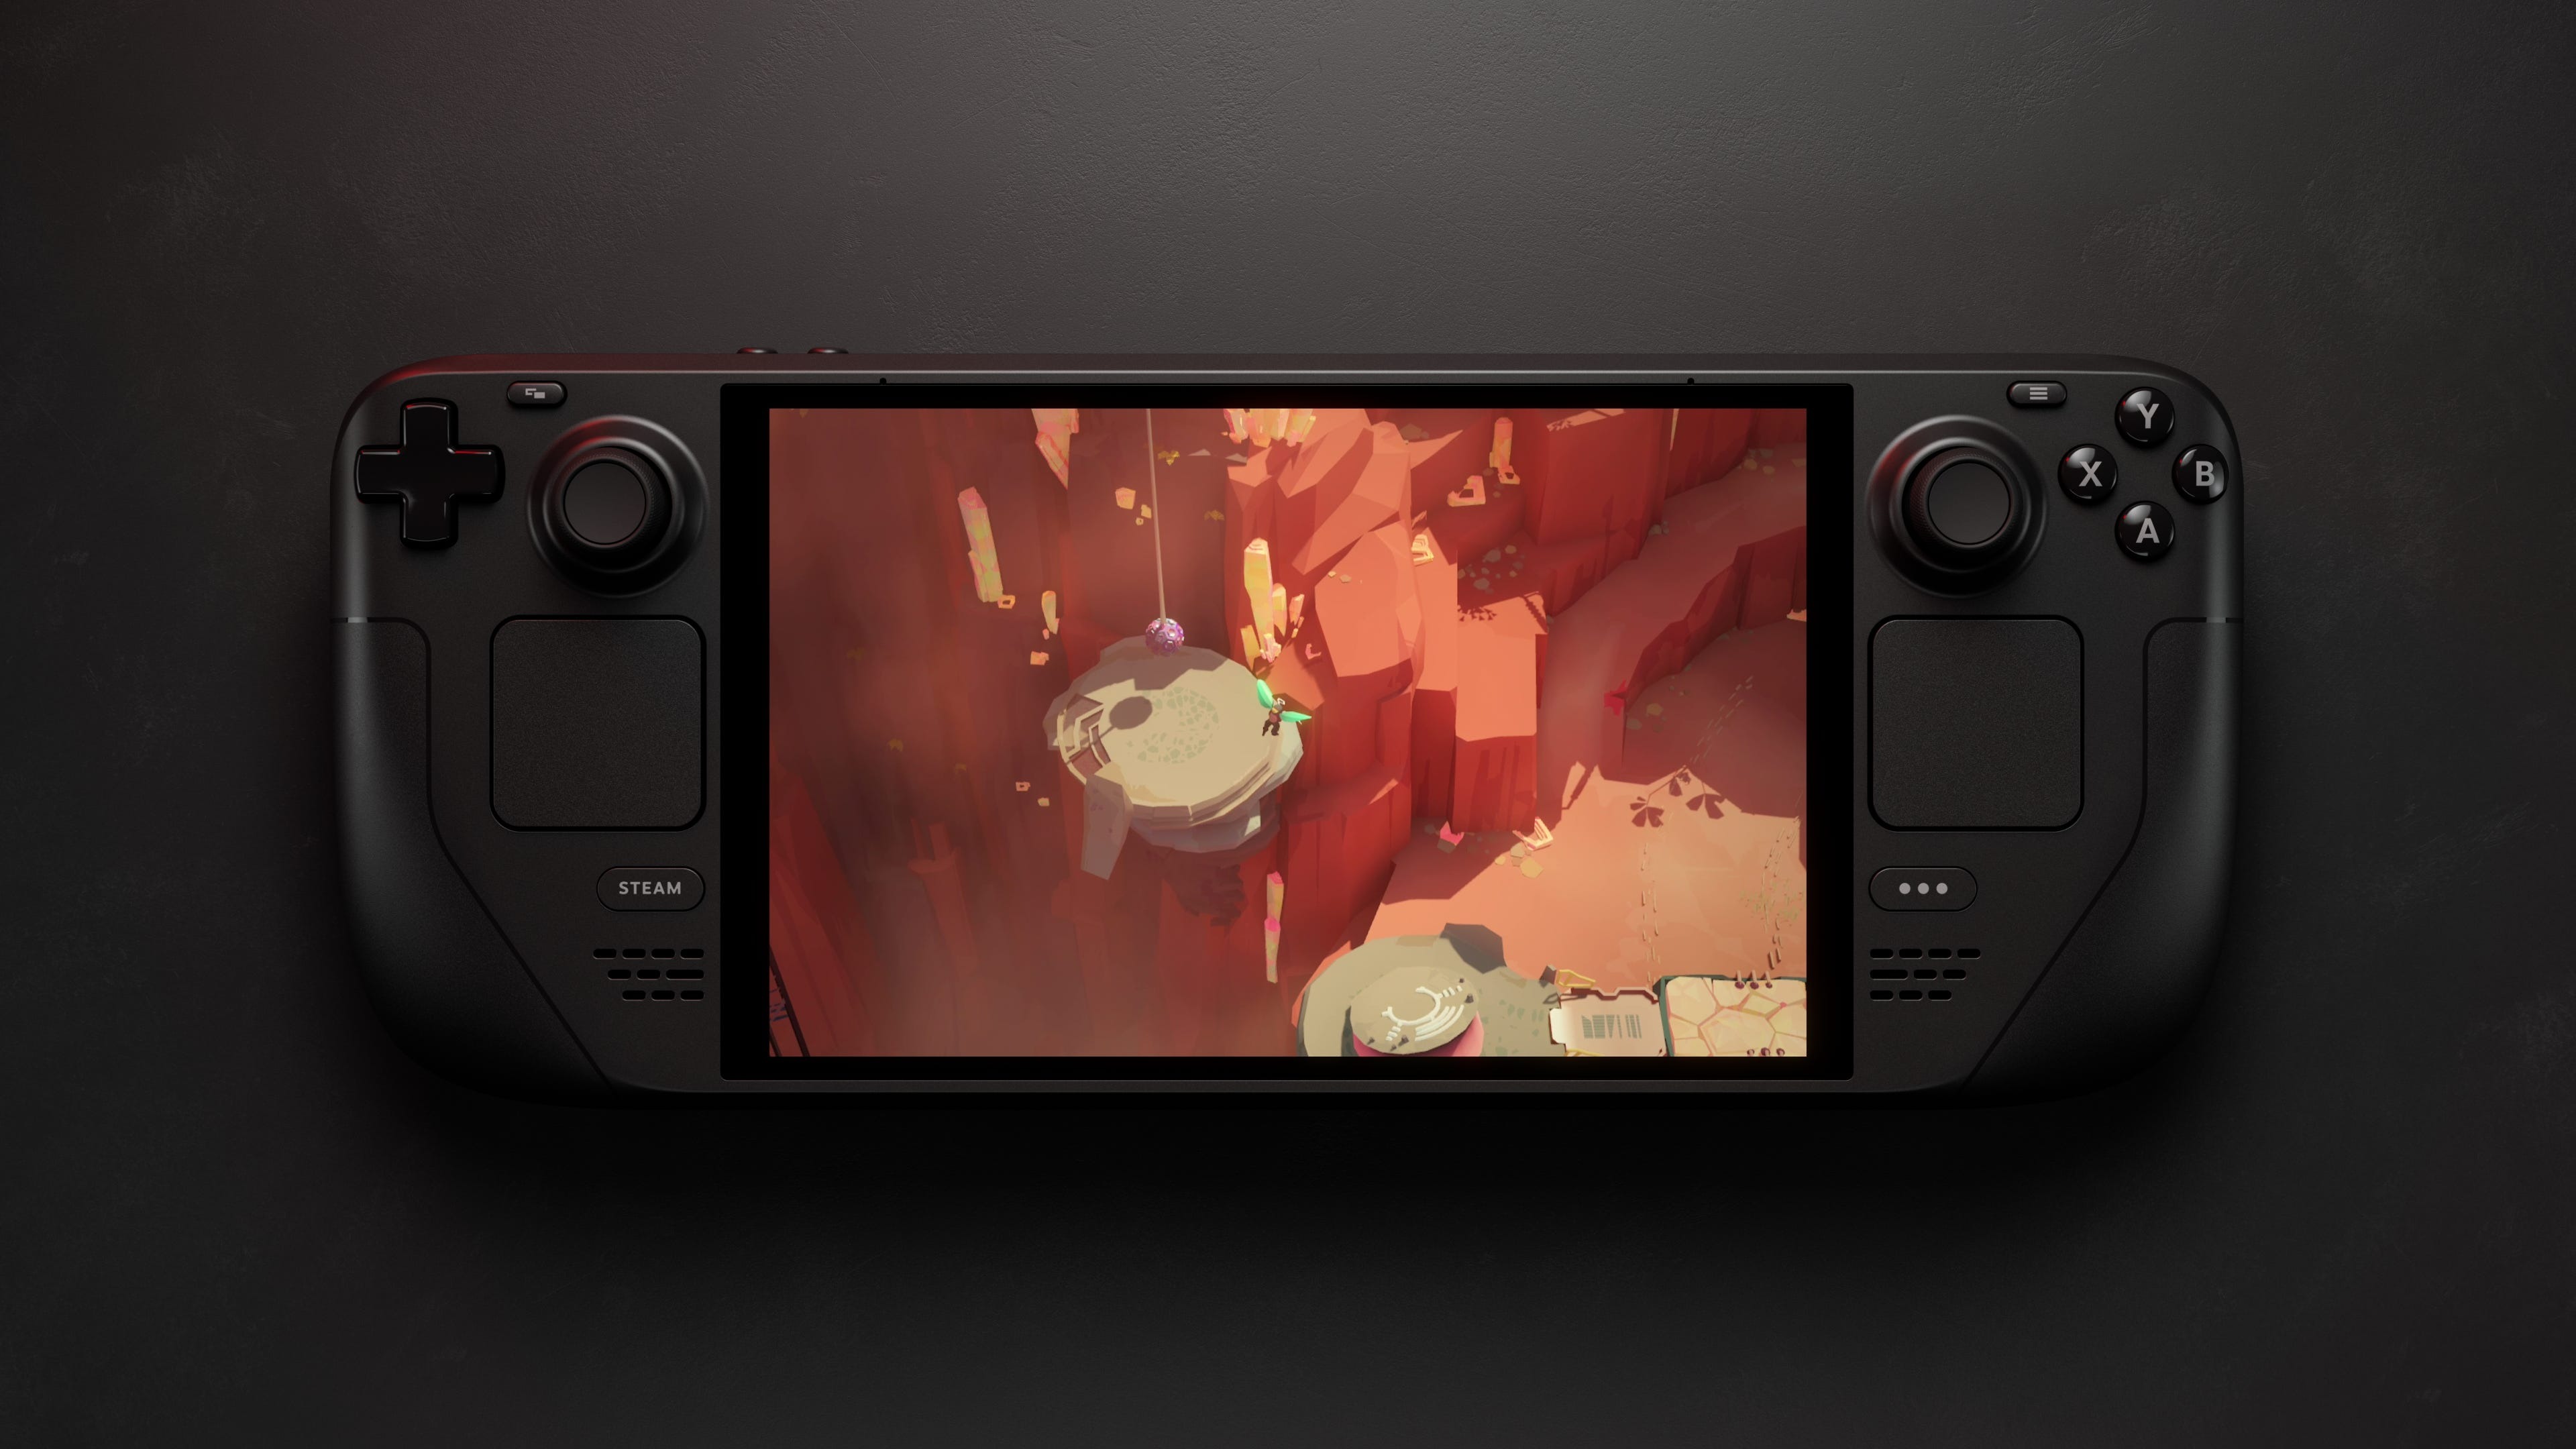
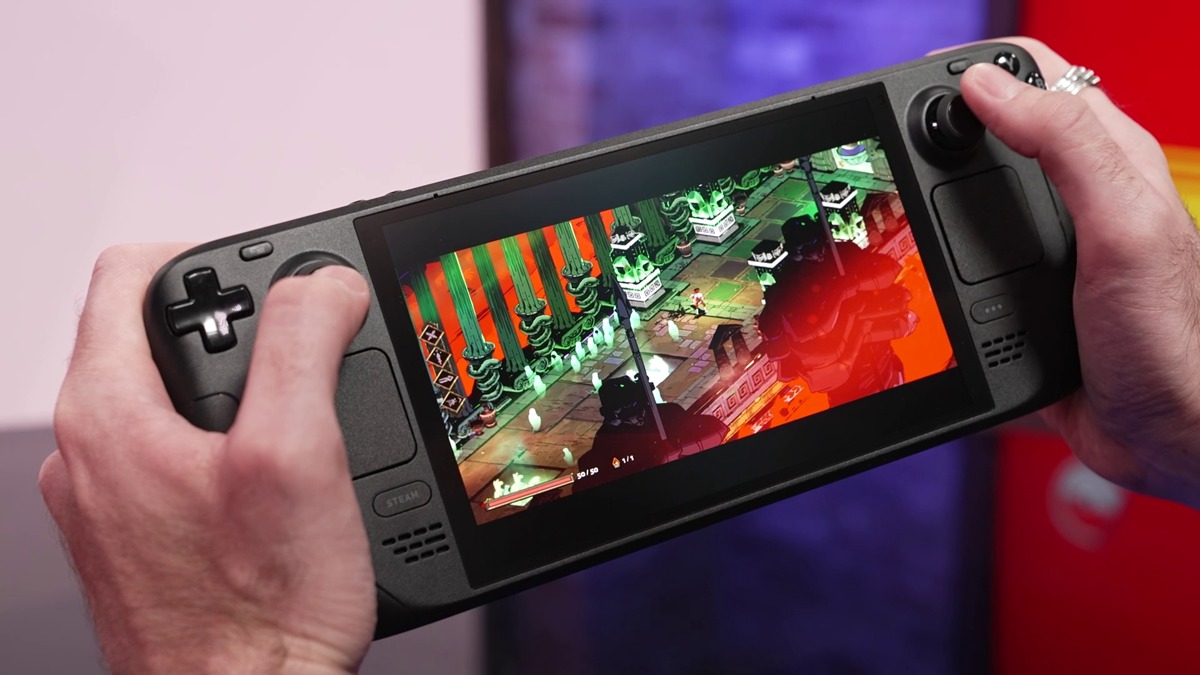
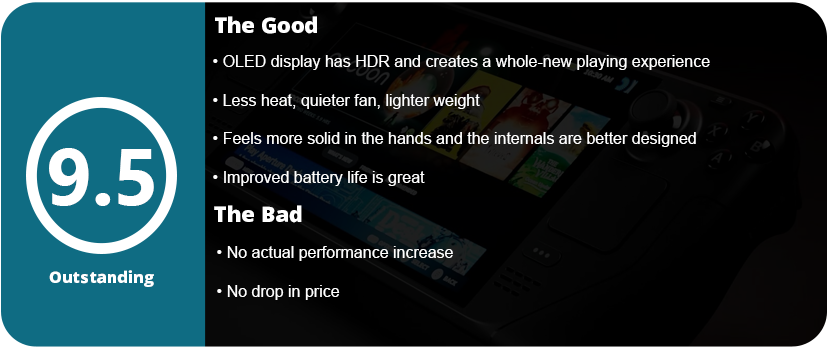
I didn’t think Valve would be pushing out a new hardware interface about a year after its release. The Steam Deck jump-started an entirely new category of hardware: handheld gaming PCs. This puts pressure on the gaming laptop market and is a great fit for desktop PC users or console owners who don’t want to invest in PC gaming. Valve took a huge page out of Nintendo’s book and listened to users. One of the most requested items was an OLED display. It’s also nearly half an inch bigger than the original LCD model. It makes a huge difference and makes games pop and come to life.
The OLED model has the same unboxing experience as the LCD model. It ships in its own carrying case inside a discreet cardboard box. You get a charger and a cleaning cloth with it. The case (at least for the 1TB model) is of higher quality than the LCD case. There is now a velcro strap that goes over the zipper to keep you from accidentally forgetting if the case is zipped and having the deck fall out. I have seen many photos on Reddit of this exact accident. Outside of that, unless you already own the original model, there won’t be much left to notice. However, having owned the original 512GB model, the deck is much lighter, and the shell itself feels more solid, almost like it’s been shot with a higher-quality or thicker plastic. There’s no squeaking or flex when you twist the system this time around.
The system doesn’t seem any thinner, but that’s okay. It does feel much lighter. The analog stick bases are now black instead of white, and the power button is orange. Other than that, there is little difference physically between the systems. The touchpads, however, are leaps and bounds better and are one of the best improvements to the system. Outside of the chipset shrink and better battery life, the OLED is quieter, which I assume is a better fan. The system also has a 90-Hz display, which is a huge deal. On top of that, the display has awesome HDR. The new screen pretty much checks all the boxes; however, only the higher-end 1TB model has better anti-glare etched glass. This increase in the 60-Hz LCD display puts it closer to its other Windows-based competitors. While not the top dog, the OLED display itself makes it the nicest-looking handheld gaming PC out there.
Don’t let the fact that there is an increase in performance confuse you. There may be negligible increases due to better thermal handling and cooling, but you won’t get huge leaps and gains. The compromise mostly focused on better battery life, which is one of the biggest complaints about the deck. The alleged 25% increase puts it closer to its competitors. The 50-watt battery helps quite a bit, as does the addition of WiFi 6E and Bluetooth 5.3. I do notice longer battery life when doing every task, from gaming to just using desktop mode.
I also want to mention that the Deck OLED itself is just built better internally. I removed the rear plate to replace it with a transparent one, and everything seemed better built. The touchpad unit is no longer so sensitive that it never feels the same again once removed. My last Steam Deck had to be repaired due to a faulty solder joint on a ribbon cable and the touchpads not working correctly, despite everything being put back correctly. I’m also happy to see just how sturdy and well-engineered everything is inside.
Outside of the actual hardware itself, how are the games? Well, since I last reviewed the Steam Deck, the OS has come a long way. Thanks to Valve’s custom chipset, they can squeeze every drop of power out of it with their custom drivers. Games run better and better every month, and games that don’t push the Deck to its limits run beautifully at 90hz. That extra boost in refresh rate really shines, allows for more responsive controls, and lets the OLED pop. The HDR is especially brilliant, with games like Tetris Connected looking stunning at 90 Hz and with HDR enabled. The screen alone can be a system seller for Valve, as people have turned the deck away for just not having an OLED panel after Nintendo spoiled everyone. The Switch OLED also doesn’t have HDR or run at 90 Hz, so it’s the best handheld display on the market right now.
What’s more to say? The Steam Deck OLED is a fascinating and wonderful piece of tech that feels as premium as The Big 3’s systems. There are downsides to being a Linux system on the software side (mostly compatibility), but there are no hardware limitations or performance overhead due to Windows 11 sucking up precious bandwidth. The OS is fully customizable thanks to third-party plugins like Decky Loader, and you can even dual-boot into Windows if you want.
Here I am again. Back where it all started. My first tablet was an Android tablet. Specifically, the Asus Nexus 7 (2012). 7″ seemed huge back in the day. Phones were just inching towards the 5″ mark, so this seemed reasonable. Now we have 14″-inch tablets that seemed like a pipe dream back in the day and, 10 years ago, cost thousands. After owning two iPads (1st and 5th Gen iPad Pros), with the last one being 12.9″, I thought that was massive. I didn’t realize how small it was compared to this tablet.
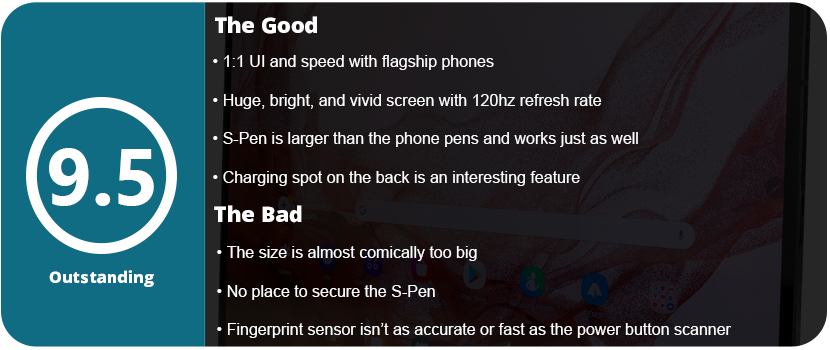
Like I’ve said in many recent tablet and phone reviews, unboxing experiences aren’t what they used to be. You get the tablet and a charging cable. Even tablets have stopped shipping with wall plugs now. The S8 Ultra is massive. When you pull it out of the box, you feel like you’re holding a small TV. Any larger, and these things will be comically too big for any practical use outside of watching videos. Going from 7″ tablets 10-12 years ago to tablets this large is strange. I remember when tablets with this screen size were thousands of dollars. What size is too big just for everyday use? I think this may have reached that limit. This thing isn’t comfortable being held with a single hand. You need a case for this thing, and sadly, the S8 Ultra does not come with one. Samsung’s offerings are $100, so a third-party option is more viable (which is what I did). Especially since the tablet comes with an S-Pen that can be easily lost without a tablet. The supplied magnets and charging area aren’t enough to keep them from falling off.
The specs on tablets these days are essentially the same as their phone counterparts. This tablet has the same Snapdragon 8 Gen 1 chipset my Galaxy Z Flip 5 has. This is perfectly fine, as these higher resolutions are almost on par with phones, so you won’t notice any noticeable slowdown in games or apps. With 8GB of RAM, you will have more than enough to play any game under the sun or multitask with many apps. Android 14 is so efficient that I haven’t run into the slowdown issues that I did just 5 years ago. 128GB of storage space is more than enough for games, comics, ebooks, etc. If you need more than that, you can expand with a microSD card, up to 1TB, which is so nice to have. 1TB cards are as low as $60 now, which is much cheaper than buying a tablet with more internal storage.
It looks like this is an extremely thin tablet for what is packed inside. The massive Super AMOLED screen with a 16:10 aspect ratio and a resolution that’s just around 2K will give you a crisp, vivid image that’s been known with all Samsung devices. The 120-Hz refresh rate is a nice plus, so everything feels and looks super smooth. Honestly, this is a direct translation from any high-end Samsung phone just steam-rolled into a 14″ tablet. There is a power and volume rocker, and the fingerprint sensor is embedded in the screen (which I’m not a huge fan of) and isn’t as fast or as accurate as the one seen in the power buttons on the phones. The software is a near 1:1 copy of that seen on any Samsung phone, so I won’t go into details on that. There doesn’t seem to be anything bespoke for the tablets. The quad-sqeakers sound fantastic from AKG. Even the cameras are surprisingly decent for a tablet.
The S-Pen is larger than that seen on phones but is essentially the same functionally. There are a couple of magnets located on the edges, and there is a large black space under the rear camera for charging. The biggest drawback to this entire tablet is not having the pen inside the tablet, but cases can remedy this. Having the pen on the back of the tablet also means it won’t lay flat, and that’s another issue as it can slip out from underneath or cause the tablet to fall. It’s a minor issue, though, that can be remedied with a case. I found the S-Pen very useful on a screen this large for writing, playing games, or just using it to navigate screens. The pen feels smooth but also has a small amount of grip on the screen, and it’s incredibly responsive. I’m not an artist either, but I’m sure this would be great to draw with.
Overall, the massive screen real estate is great for movies, comics, reading, games, and drawing. Alternatively, you can use a Bluetooth mouse and keyboard and use this 14″ Android-powered laptop as well. It’s very versatile and great for multitasking and document writing as well. However, if you’re looking for something small to just lay in bed with, this isn’t the tablet for you. You need a case with a kickstand or hold it with two hands, and that may be too much for some people. The specs are on par with flagship phones, and the UI is 1:1 with them as well. If you own a Samsung phone, this tablet will be an easy transition for you.
Update: I have been getting a lot of comments and messages regarding my opinion on the tablet size. This review is for personal everyday use. Not business, not work, not anything else. Tablets have never been this large until the last couple of years that are affordable for the average consumer. Most people I’ve talked to think this size it too big. The sub-10″ range seems to be best for most people. The tablet is heavy and hard to hold with one hand to lay down and play games or flick through the news, and if you add the bulk of a case it’s even heavier, plus you need a case that can hold the pen. Those things are objectively true when using the tablet. I have been told by other users who bought this, or any Samsung tablet, that they stick the pen in a drawer and forget about it because it’s not worth the hassle to keep track of it which is a valid point.Despite my highly positive review here people are harping on a single subject that I think is worth addressing.


Super, thank you